Harley-Davidson Panel Lights Explained: Meanings Fixes
Harley-Davidson panel lights are your motorcycle’s way of communicating important information about your ride. This guide breaks down every warning light, gauge, and indicator on your Harley-Davidson dashboard so you know exactly what each symbol means. We also walk you through practical fixes, common mistakes to avoid, and expert tips to keep your instrument cluster working perfectly.
Your Harley-Davidson dashboard does more than just look cool. It tells you exactly what is happening under the hood while you ride. Every light, gauge, and symbol on your instrument panel has a specific job. When something lights up, it is trying to tell you something important.
Whether you are a first-time Harley owner or a seasoned rider, understanding your Harley-Davidson panel lights is essential. These dashboard indicators help you monitor engine health, fuel levels, tire pressure, and much more. Ignoring them can lead to expensive repairs or even dangerous riding conditions.
In this guide, we break down every single light on your Harley’s instrument cluster. You will learn what each symbol means, why it might be flashing, and exactly how to fix it. We also share tips that mechanics do not always tell you. By the end, you will feel confident reading your dashboard like a pro.
Let us dive into the world of Harley-Davidson instrument panel lights and make sure your ride stays safe and smooth.
Key Takeaways
- Know Your Lights: Understanding each panel light on your Harley helps you spot problems early and ride safely.
- Quick Fixes Exist: Many dashboard warnings are simple to resolve at home with basic tools.
- Preventive Maintenance Matters: Regular checks of your instrument cluster can save you from costly repairs.
- Don’t Ignore Warning Symbols: Each light serves a purpose, and ignoring them can lead to serious mechanical issues.
- Diagnostic Tools Help: Using a motorcycle diagnostic scanner makes finding the root cause much faster.
- Know When to Call a Pro: Some electrical issues need professional attention to avoid further damage.
📑 Table of Contents
- Understanding Your Harley-Davidson Dashboard Layout
- Common Harley-Davidson Warning Lights and Their Meanings
- How to Diagnose Panel Light Issues
- Step-by-Step Fixes for Common Panel Light Problems
- Quick Tips for Keeping Your Panel Lights Working
- Common Mistakes Riders Make with Dashboard Lights
- When to See a Professional
- Expert Insights on Harley-Davidson Electrical Systems
- Comparison: OEM vs Aftermarket Panel Lights
- Final Thoughts on Harley-Davidson Panel Lights
Understanding Your Harley-Davidson Dashboard Layout
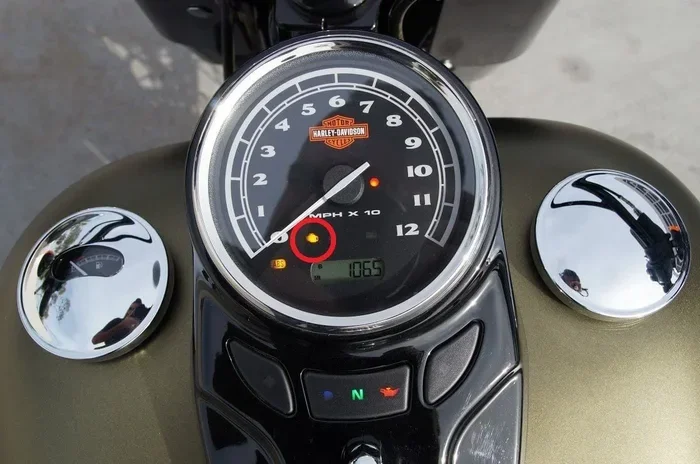
Before we get into individual lights, let us talk about the layout. Most Harley-Davidson models feature a classic analog dashboard with a few digital elements. The main components include a speedometer, tachometer, fuel gauge, and temperature gauge. Surrounding these gauges are small indicator lights that activate when something needs your attention.
The instrument cluster sits right in front of the rider, usually inside a protective lens. Over time, the plastic can yellow or crack, making it harder to read the lights. Keeping your cluster clean and well-maintained ensures you never miss a warning.
The Analog Gauges
The analog gauges are the classic round dials that give your Harley its iconic look. The speedometer shows your current speed, while the tachometer measures engine RPM. The fuel gauge tells you how much gas you have left, and the temperature gauge monitors your engine heat. Each of these gauges has a normal operating range, and staying within it keeps your motorcycle running smoothly.
The Digital Indicator Lights
Surrounding the analog gauges are small LED or incandescent lights. These are the Harley-Davidson dashboard warning lights that flash on and off to alert you. Some stay solid when a condition is active, while others blink to signal urgency. Understanding the difference between a steady light and a flashing one is key to responding correctly.
Common Harley-Davidson Warning Lights and Their Meanings
Now let us get into the heart of the matter. Here is a detailed breakdown of the most common Harley-Davidson warning lights you will see on your dashboard.
Check Engine Light
The check engine light is one of the most recognized symbols on any motorcycle. On a Harley, it usually looks like an engine outline. When this light comes on, it means the onboard diagnostic system has detected a problem. This could be anything from a loose gas cap to a serious engine fault.
Do not panic if you see this light. However, do not ignore it either. Pull over safely and check for obvious issues. If the light is flashing, reduce your speed immediately, as this often signals a more urgent problem.
Oil Pressure Warning
The oil pressure warning light looks like an old-fashioned oil can with a drip. This is one of the most critical Harley-Davidson instrument panel lights. When it illuminates, it means your engine oil pressure is too low. Low oil pressure can cause severe engine damage within minutes.
If this light comes on, pull over and shut off the engine right away. Check your oil level and top it off if needed. If the light stays on after adding oil, you may have a leak or a failing oil pump. Get it to a mechanic as soon as possible.
Battery and Charging System Light
This light looks like a battery icon and indicates a problem with your charging system. It could mean your battery is dying, your alternator is failing, or there is a wiring issue. A dead battery on the road is no fun, so pay attention to this symbol.
If you see this light while riding, turn off all unnecessary electrical accessories like heated grips or audio systems. Head to the nearest service shop. Riding with a charging system failure can leave you stranded.
ABS Warning Light
Many modern Harleys come equipped with ABS, or anti-lock braking system. The ABS warning light looks like the letters “ABS” inside a circle. When this light is on, your ABS function may be disabled, though your regular brakes will still work.
This does not mean you should stop riding, but you should get the system checked soon. Riding in wet or slippery conditions without ABS requires extra caution. The light often comes on due to a sensor issue, which is usually a simple fix.
Temperature Warning Light
The temperature warning light signals that your engine is running too hot. It often looks like a thermometer or a temperature gauge icon. Overheating can warp engine parts and cause costly damage if not addressed quickly.
If this light comes on, find a safe place to stop. Let the engine cool down for at least 15 minutes. Check your coolant level and look for any visible leaks. Never open the radiator cap while the engine is hot, as pressurized coolant can cause burns.
Turn Signal Indicator
Your turn signals are essential for safe riding. The indicator lights on your dashboard show whether your left or right turn signal is active. If one of these lights flashes faster than usual, it typically means the corresponding turn signal bulb is burned out.
This is one of the easiest Harley-Davidson panel lights to fix. Simply replace the bulb and the flashing rate will return to normal. Always check both turn signals before every ride.
Fuel Gauge Warning
The fuel gauge warning light is often a gas pump icon. It comes on when your fuel level drops critically low. While it might be tempting to ride on fumes to reach the next gas station, doing so can strain your fuel pump.
Make it a habit to refuel when your gauge hits a quarter tank. This keeps your fuel pump cool and extends its lifespan. Running on empty repeatedly can lead to expensive fuel pump replacements.
Neutral Safety Light
The neutral light tells you that your transmission is in neutral. This is especially helpful when starting your Harley or making slow maneuvers in traffic. If this light does not come on, your bike might not start, or you could accidentally stall in gear.
A faulty neutral sensor is usually the culprit. Replacing it is straightforward and inexpensive. If you are unsure, your owner’s manual has the exact location of the sensor.
How to Diagnose Panel Light Issues
Not all dashboard warnings mean something is broken. Sometimes the light itself is the problem. Here is how you can diagnose issues with your Harley-Davidson instrument panel lights.
Step 1: Note the Pattern
Start by observing the light carefully. Is it steady or flashing? Does it come on when the engine is cold and go away when warm? Does it appear only at certain speeds or under specific conditions? These patterns give you clues about what is really going on.
Write down the symbol, when it appears, and what you were doing at the time. This information is gold when you visit a mechanic or search for solutions online.
Step 2: Check the Bulb
Sometimes the warning light is on because the bulb behind the gauge is burned out, not because the system has a problem. This is especially common with older Harleys that use incandescent bulbs. A burned-out bulb can make it look like a warning is active when it is not.
Open the instrument cluster and inspect each bulb. Replacement bulbs are inexpensive and easy to find. A quick swap can save you a lot of unnecessary worry.
Step 3: Use a Diagnostic Scanner
Modern Harleys have an onboard diagnostic system that stores error codes. A motorcycle diagnostic scanner can read these codes and tell you exactly what is wrong. You can buy a compatible scanner for under $100, or visit a Harley dealer or independent shop.
The scanner plugs into a diagnostic port, usually located under the seat or near the battery. Once connected, it displays error codes that correspond to specific issues. This method removes the guesswork and helps you fix problems faster.
Step 4: Check Wiring and Connections
Loose or corroded wiring is a common cause of flickering or stuck panel lights. Over time, vibrations from riding can loosen connections behind the dashboard. Inspect the wiring harness for any signs of wear, fraying, or corrosion.
Use a multimeter to test for continuity in the wires leading to each light. If you find a broken wire or loose connector, repair it with soldering or a new connector. Always disconnect the battery before working on any electrical components.
Step-by-Step Fixes for Common Panel Light Problems
Once you have identified the issue, here is how to fix the most common Harley-Davidson panel lights problems.
Replacing a Burned-Out Bulb
- Turn off the motorcycle and remove the key.
- Carefully remove the instrument cluster lens. Use a soft cloth to avoid scratching it.
- Locate the burned-out bulb behind the affected gauge or indicator.
- Gently pull the old bulb out and note its type and size.
- Insert the new bulb and push it firmly into place.
- Reassemble the cluster and test the light.
This fix takes about 10 minutes and costs less than $5 for the replacement bulb. It is the easiest dashboard troubleshooting task you can do at home.
Fixing a Flickering Dashboard
A flickering dashboard is annoying and can be a sign of a deeper electrical issue. Start by checking the ground wire connected to the instrument cluster. A poor ground connection causes flickering in many cases. Clean the ground point with a wire brush and tighten the connection.
If cleaning the ground does not help, check the voltage regulator. A failing regulator can send inconsistent power to the dashboard. Replace it if you find it is not outputting the correct voltage. Most regulators cost between $30 and $80 and are easy to install.
Resetting Warning Lights After a Repair
Once you fix the underlying problem, the warning light may not turn off automatically. Here is how to reset it:
- Turn the ignition to the “on” position without starting the engine.
- Press and hold the odometer reset button for about 10 seconds.
- Release the button and start the engine.
- The warning light should now be off.
If the light comes back on, the problem has not been fully resolved. Go back and double-check your repair. Sometimes the issue is intermittent and requires further investigation.
Replacing the Instrument Cluster
If the entire cluster goes dark or multiple lights stop working, you may need to replace the unit. Before buying a new one, check the fuse box. A blown fuse can mimic a dead cluster. Replace the fuse first and see if that solves the problem.
If the fuse is fine, you will need a replacement cluster. Make sure it matches your Harley model year and type. After installation, you may need to reprogram certain settings or mileage readings. Some shops can do this for a small fee.
Quick Tips for Keeping Your Panel Lights Working
Prevention is always better than cure. Here are some quick tips to keep your Harley-Davidson panel lights in top shape.
- Clean your cluster regularly: Dust and grime can obscure lights and make them hard to read. Use a soft microfiber cloth and a mild cleaner.
- Check bulbs during routine maintenance: Replace any dim or burned-out bulbs before they cause confusion on the road.
- Keep your battery healthy: A weak battery can cause dim or flickering dashboard lights. Test your battery every few months.
- Protect against moisture: Water damage is a common cause of electrical issues. Make sure the cluster lens seal is intact and free of cracks.
- Use OEM or quality replacement parts: Cheap aftermarket bulbs can burn out quickly or flicker. Stick with reputable brands for reliability.
- Read your owner’s manual: Every Harley model has specific details about its dashboard. The manual is your best reference guide.
Common Mistakes Riders Make with Dashboard Lights
Even experienced riders sometimes make mistakes when dealing with motorcycle instrument panel lights. Here are the most common ones to avoid.
Ignoring the Check Engine Light
Many riders assume the check engine light is just a minor issue. While it can be triggered by something simple like a loose gas cap, it can also signal a serious engine problem. Always get it checked, especially if it flashes.
Assuming All Lights Mean the Same Thing
Not all warning lights are created equal. A steady yellow light usually means a non-critical issue, while a flashing red light demands immediate attention. Learn the difference and respond accordingly.
DIY Repairs Without Proper Knowledge
It is great to be hands-on, but some electrical repairs require specific knowledge. Working on the wiring without understanding the circuit can cause more damage. When in doubt, consult a professional or watch trusted tutorial videos before attempting a fix.
Skipping Regular Maintenance
Skipping scheduled maintenance is one of the fastest ways to develop dashboard problems. Regular oil changes, battery checks, and electrical inspections keep your entire motorcycle running smoothly, including the instrument panel.
When to See a Professional
While many Harley-Davidson panel light issues can be fixed at home, some problems need professional attention. Here are signs that it is time to visit a mechanic:
- Multiple warning lights come on at the same time.
- The dashboard goes completely dark and does not respond to troubleshooting.
- You smell burning plastic or notice smoke near the instrument cluster.
- The check engine light stays on after multiple resets.
- Your motorcycle runs rough or stalls frequently alongside dashboard warnings.
A qualified Harley technician has the tools and expertise to diagnose complex electrical issues. They can also access dealer-level diagnostic software that catches problems you might miss at home.
Expert Insights on Harley-Davidson Electrical Systems
Expert Insight: Many Harley owners do not realize that the electrical system on modern Harleys is highly integrated. A problem in one area, like the charging system, can cascade into dashboard warnings across multiple lights. Always trace the root cause rather than just replacing individual bulbs or fuses.
Another important point is that Harley-Davidson has been updating its electrical architecture across model years. Newer models use more advanced digital clusters with integrated diagnostics. If you own a classic or vintage Harley, you might benefit from an aftermarket digital upgrade that provides clearer readouts and modern warning features.
Keeping your motorcycle’s electrical system in good shape also extends the life of other components. The alternator, battery, and wiring harness all work together. A single weak link can affect the entire system, including your instrument panel.
Comparison: OEM vs Aftermarket Panel Lights
When it comes time to replace your Harley-Davidson instrument panel lights, you have two main options: OEM (original equipment manufacturer) parts or aftermarket alternatives. Here is a quick comparison.
| Feature | OEM Parts | Aftermarket Parts |
|---|---|---|
| Fit and Finish | Perfect match | Varies by brand |
| Durability | High quality | Depends on manufacturer |
| Price | Higher cost | More affordable |
| Warranty | Full manufacturer warranty | Limited warranty |
| Availability | Dealer or online | Widely available |
| Compatibility | Guaranteed | Check model fitment |
OEM parts are the safest choice for maintaining the original look and function of your Harley. Aftermarket parts can save money and offer upgrades like brighter LED bulbs. Just make sure any aftermarket part is compatible with your specific model and year.
Final Thoughts on Harley-Davidson Panel Lights
Your Harley-Davidson panel lights are more than just decorative elements on your dashboard. They are your first line of defense against mechanical failures and safety hazards. Taking the time to understand each light and its meaning empowers you as a rider and owner.
With the knowledge in this guide, you can now confidently diagnose and fix most dashboard issues. Regular maintenance, quick attention to warning lights, and smart use of diagnostic tools will keep your Harley running at its best. Remember, a well-maintained instrument cluster not only improves safety but also enhances the overall riding experience.
Ride smart, stay alert, and never let a dashboard light go unexplained. Your Harley deserves the best care, and now you have the tools to provide it.
Frequently Asked Questions
What does the red oil can light mean on my Harley?
The red oil can light indicates low oil pressure, which is a serious issue. Stop riding immediately and check your oil level. Continuing to ride with low oil pressure can cause permanent engine damage. Top off the oil or seek professional help if the light persists.
How do I reset the check engine light on my Harley-Davidson?
You can reset the check engine light by turning the ignition on without starting the engine, holding the odometer reset button for 10 seconds, then starting the engine. If the light returns, there is an unresolved issue that needs to be addressed. Use a diagnostic scanner to find the specific error code.
Can I ride my Harley if the ABS light is on?
Yes, you can ride with the ABS light on, but your anti-lock braking system will be disabled. Your regular brakes will still work. Exercise extra caution in wet or slippery conditions and have the ABS system inspected as soon as possible.
Why are my Harley dashboard lights dim or flickering?
Dim or flickering dashboard lights are often caused by a poor ground connection, a weak battery, or a failing voltage regulator. Start by cleaning the ground wire and checking the battery voltage. If the issue persists, the voltage regulator may need replacement.
Are aftermarket LED bulbs safe to use in my Harley instrument cluster?
Yes, aftermarket LED bulbs are generally safe and can provide brighter, clearer illumination. However, make sure the LED bulbs are compatible with your specific Harley model. Some LED bulbs can cause hyperflashing in turn signals, which may require a resistor to fix.
How often should I inspect my Harley’s instrument panel lights?
You should inspect your instrument panel lights at least once a month or before any long ride. A quick visual check takes only a few minutes and can catch issues early. Include this in your regular pre-ride safety checklist for the best results.
=== CONCLUSION ===
Understanding your Harley-Davidson panel lights explained is one of the most valuable skills any rider can develop. From the check engine light to the oil pressure warning, each symbol on your dashboard serves a vital purpose. When you know what they mean and how to respond, you ride with confidence and keep your motorcycle in top condition.
Use this guide as your go-to reference whenever a light appears on your Harley-Davidson instrument panel. Share it with fellow riders who might benefit from the information. And remember, a quick response to a dashboard warning today can save you from a major repair tomorrow. Keep riding, stay safe, and let your Harley’s lights guide the way.