Can I Install Splash Guards Myself The Ultimate Answer
Yes, you can absolutely install splash guards yourself with basic tools and a little patience. This guide covers everything from choosing the right splash guards to mounting them securely on your vehicle. You will learn the step-by-step process, common mistakes to avoid, and how to keep your mud flaps and wheel well liners in great shape for years.
Have you ever driven behind a truck on a wet road and felt a cloud of mud hit your car? It is not a fun experience. That is exactly what splash guards are designed to prevent. These simple but important accessories protect your vehicle from road debris, water, mud, and stones. And here is the best part. You do not need to visit a mechanic or spend a fortune to get them installed.
So, can you install splash guards yourself? The short answer is yes. With the right tools, a little bit of know-how, and about thirty to sixty minutes of your time, you can mount splash guards on your car or truck without any professional help. This guide will walk you through every single step. We will cover the different types of splash guards available, the tools you need, the installation process, and common mistakes to avoid.
Whether you drive a sedan, SUV, or pickup truck, this article has you covered. We will break everything down into simple, easy-to-follow instructions. By the end, you will feel confident enough to tackle the job on your own. Let us get started.
Key Takeaways
- DIY Installation Is Doable: Most splash guards can be installed at home with simple tools and no professional help.
- Choose the Right Type: Bolt-on, clip-on, and universal fit splash guards each have unique benefits for different vehicles.
- Save Money: Installing splash guards yourself can save you $50 to $150 in labor costs.
- Avoid Common Mistakes: Proper alignment, correct fasteners, and clean surfaces make all the difference.
- Maintenance Matters: Regular cleaning and inspection extend the life of your splash guards significantly.
- Know When to Call a Pro: Complex vehicles or clip-on systems may need professional help for the best results.
📑 Table of Contents
- What Are Splash Guards and Why Do You Need Them?
- Types of Splash Guards Available for Your Vehicle
- Tools and Materials You Will Need for the Job
- Step-by-Step Guide to Install Splash Guards Yourself
- Common Mistakes to Avoid When Installing Splash Guards
- Maintaining Your Splash Guards for Long-Lasting Protection
- Conclusion
What Are Splash Guards and Why Do You Need Them?
Splash guards, also known as mud flaps or tire splash shields, are panels mounted behind the wheels of your vehicle. Their main job is to block water, mud, rocks, and other road debris from flying up onto your car. Without them, your paint job, headlights, and undercarriage take a beating every time you drive on wet or dirty roads.
How Splash Guards Protect Your Vehicle
When you drive on a rainy day, your tires kick up water and mud. This debris can hit the sides of your car, the undercarriage, and even your windshield. Over time, this causes scratches, rust, and damage to important parts. Splash guards act as a barrier. They catch most of this debris before it reaches your vehicle.
Here are the key benefits of using splash guards:
- Paint Protection: They prevent chips and scratches from road stones and gravel.
- Undercarriage Defense: They reduce the amount of water and mud hitting your exhaust and suspension parts.
- Cleaner Vehicle: Your car stays cleaner for longer, which means less frequent car washes.
- Safety Boost: They keep debris from flying into the path of vehicles behind you.
- Rust Prevention: Less moisture on your undercarriage means less rust over time.
Many drivers overlook splash guards until they already have damage. Do not wait for that to happen. Installing them early is one of the smartest things you can do for your vehicle.
Who Needs Splash Guards the Most?
While every vehicle can benefit from splash guards, some drivers need them more than others. If you frequently drive on dirt roads, gravel highways, or in rainy climates, splash guards are a must. Truck owners and SUV drivers especially benefit because their larger tires kick up more debris. Even if you mostly drive in the city, splash guards still offer valuable protection from puddles and road spray.
Types of Splash Guards Available for Your Vehicle
Not all splash guards are the same. Before you start installing, it is important to understand the different types available. Each type has its own advantages and fits different vehicles and budgets.
Bolt-On Splash Guards
Bolt-on splash guards are the most secure option. They are attached to your vehicle using bolts and screws. This type provides a very tight fit and stays in place even at high speeds. Bolt-on guards are ideal for trucks and SUVs that experience heavy road debris. The downside is that installation takes a bit more time and effort compared to other types.
Clip-On Splash Guards
Clip-on mud flaps use plastic clips or fasteners that snap into place. They are the easiest type to install and are popular among DIY beginners. Clip-on guards work well for most sedans and compact SUVs. However, they may not be as durable as bolt-on options, especially on rough roads.
Universal Fit vs. Custom Fit
Universal fit splash guards are designed to fit a wide range of vehicles. They are adjustable and usually more affordable. However, they may not look as clean or fit as precisely as custom fit options. Custom fit splash guards are designed specifically for your vehicle make and model. They offer the best appearance and performance but tend to cost more.
| Type | Installation Difficulty | Durability | Best For | Price Range |
|---|---|---|---|---|
| Bolt-On | Moderate | High | Trucks, SUVs | $30-$80 |
| Clip-On | Easy | Medium | Sedans, Compact SUVs | $15-$40 |
| Universal Fit | Easy to Moderate | Medium | Any Vehicle | $10-$35 |
| Custom Fit | Moderate | High | Specific Makes/Models | $40-$100 |
When choosing your splash guards, consider your driving conditions, vehicle type, and budget. A good pair of rubber splash guards offers flexibility and durability, while plastic mud flaps are lighter and easier to install.
Tools and Materials You Will Need for the Job
Before you start installing your splash guards, gather all the tools and materials you will need. Having everything ready before you begin makes the process much smoother and faster. Here is a complete checklist.
Essential Tools
- Socket wrench set (for bolt-on guards)
- Screwdriver set (Phillips and flathead)
- Measuring tape (for alignment)
- Marker or pencil (for marking drill points)
- Drill with appropriate bits (if mounting new holes)
- Cleaning cloth or sponge (for surface prep)
- Rubber mallet (for tapping clips into place)
- Safety gloves and goggles
Materials You May Need
- Splash guards (choose your type from the section above)
- Mounting bolts and nuts (often included with the guards)
- Rubber washers (to prevent water leaks)
- Anti-corrosion spray (for bolt holes)
- Zip ties (for temporary holding during alignment)
Pro tip: Lay out all your tools on a clean surface before you begin. This simple step saves time and prevents frustration during the installation process.
Quick Tips for Tool Prep
Make sure your socket wrench set includes both metric and standard sizes. You never know which fasteners your vehicle uses. Also, keep a towel nearby to wipe off any dirt or grease before you mount the splash guards. Clean surfaces help the guards stay in place longer.
Step-by-Step Guide to Install Splash Guards Yourself
This is the most important part of the article. Follow these steps carefully, and you will have your splash guards installed in no time. Each step is designed to be simple and easy to follow.
Step 1: Clean the Installation Area
Start by cleaning the area where you will mount the splash guards. Use a damp cloth to wipe down the wheel well and the inner fender. Remove any dirt, mud, or debris. This ensures a clean surface for mounting and helps the guards adhere or bolt on properly.
For bolt-on guards, also clean the areas where you will drill or bolt. Any dirt or grease can weaken the hold over time.
Step 2: Position the Splash Guard
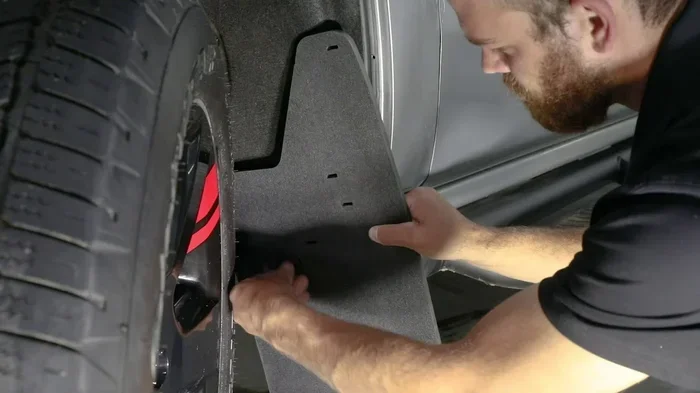
Hold the splash guard up against the wheel well. Use a helper or zip ties to temporarily hold it in place. Check the alignment carefully. The guard should cover the top of the tire and extend down along the fender. Make sure it does not touch the tire when the wheel turns.
Use a measuring tape to check that both sides are even. Misaligned splash guards can rub against the tire or look uneven, which affects both performance and appearance.
Step 3: Mark the Drill Points
Once you are happy with the position, use a marker to mark the drill points. For bolt-on guards, mark where each bolt hole falls. For clip-on guards, mark the clip locations. Double-check your marks before drilling. A small mistake can lead to a hole in the wrong spot.
Expert insight: If your vehicle already has pre-drilled holes for splash guards, you can skip this step entirely. Just clean the existing holes and move to the next step.
Step 4: Drill the Holes (If Needed)
If you need to drill new holes, put on your safety goggles and gloves. Use a drill bit that matches the size of your mounting bolts. Drill straight and steady. Do not press too hard, or the bit may slip and scratch nearby surfaces.
After drilling, clean the holes with a cloth to remove any metal shavings. Apply a small amount of anti-corrosion spray to the holes. This prevents rust from forming around the bolt points over time.
Step 5: Mount the Splash Guard
Now it is time to attach the splash guard. For bolt-on guards, insert the bolts through the guard and into the holes. Use a socket wrench to tighten them securely. Do not overtighten, as this can crack the plastic or rubber of the guard.
For clip-on guards, simply press each clip into its designated spot. Use a rubber mallet to gently tap them into place if needed. Make sure each clip clicks or holds firmly.
Quick tip: Install the splash guards one at a time. This gives you full control over alignment and ensures each guard is secure before moving to the next one.
Step 6: Check the Fit and Tighten
Once all the guards are mounted, check the fit by spinning the tire slowly. Look for any contact between the guard and the tire. The guard should have a small gap of about half an inch from the tire surface. If it touches the tire, adjust the position and re-tighten.
Go around all the bolts and clips one more time. Make sure everything is tight and secure. Give each guard a gentle tug to confirm it does not move.
Step 7: Final Inspection
Take your vehicle for a short test drive at low speed. Listen for any rattling or rubbing sounds. Check the guards after the drive to make sure they have not shifted. If everything looks and sounds good, you are done. You just installed your splash guards yourself.
Common mistakes to watch for during this final step: Do not ignore small rattles. They usually mean a clip or bolt is loose. Tighten it immediately to prevent the guard from falling off on the road.
Common Mistakes to Avoid When Installing Splash Guards
Even with the best instructions, mistakes can happen. Here are the most common errors people make when installing splash guards and how to avoid them.
Skipping Surface Preparation
One of the biggest mistakes is rushing through surface preparation. If you do not clean the mounting area properly, the guards may not stay in place. Dirt and grease reduce the grip of clips and can cause bolts to loosen over time. Always take the time to clean every surface before mounting.
Using the Wrong Fasteners
Not all bolts and clips are the same. Using the wrong size or type of fastener can damage your vehicle or cause the guard to fall off. Always check the manufacturer’s instructions and use the hardware provided with your splash guards. If you need to buy additional fasteners, make sure they match the correct size and material.
Over-Tightening Bolts
It is tempting to crank down on every bolt as tight as possible. However, over-tightening can crack the splash guard material or strip the threads in your vehicle’s body. Tighten bolts firmly but gently. Stop when you feel resistance. The guard should be snug, not crushed.
Ignoring Tire Clearance
Your splash guard must have enough clearance from the tire. If the guard is too close to the tire, it will rub against the rubber every time you drive. This causes rapid wear on both the guard and the tire. Always check the gap by spinning the tire before finalizing the installation.
Installing on a Wet or Dirty Surface
Never install splash guards on a wet or dirty surface. Moisture can trap dirt under the clips or bolts, leading to corrosion and loose fittings. Wait for a dry day and clean the surface thoroughly before you begin.
Maintaining Your Splash Guards for Long-Lasting Protection
Installation is only half the battle. Proper maintenance keeps your splash guards working effectively for years. Here are some simple tips to care for your wheel well liners and tire splash shields.
Regular Cleaning
Splash guards collect dirt, mud, and debris over time. Clean them regularly with soap and water. A hose works well for rinsing off built-up grime. For stubborn stains, use a soft brush. Avoid harsh chemicals or pressure washers set to high pressure, as these can crack or warp the guard material.
Inspect for Damage
Every few months, inspect your splash guards for cracks, tears, or loose mounting points. Small damage can grow into bigger problems if left unchecked. If you notice a crack, you can often repair it with automotive plastic repair kits. For major damage, replacement is the best option.
Check Bolts and Clips
Vibrations from driving can loosen bolts and clips over time. Every six months, go around all your splash guards and check that every fastener is tight. This simple habit prevents guards from falling off or becoming misaligned.
Replace When Needed
Even with good care, splash guards do not last forever. Most aftermarket parts last between three and five years depending on driving conditions. If your guards are cracked, discolored, or no longer providing proper coverage, it is time to replace them. Replacing splash guards is a quick and affordable job that keeps your vehicle protected.
Expert Insight on Longevity
Automotive experts recommend choosing rubber splash guards for areas with harsh winters. Road salt and ice can damage plastic guards quickly. Rubber is more resistant to these elements and tends to last longer in tough conditions. For mild climates, plastic guards work perfectly well and are easier to replace.
Conclusion
So, can you install splash guards yourself? Absolutely. With the right type of splash guards, the proper tools, and a little patience, you can protect your vehicle from road debris without spending a dime on labor. The process is straightforward, and the results are well worth the effort.
Remember to choose the right type of guard for your vehicle, follow each step carefully, and avoid the common mistakes we covered. Regular maintenance will keep your splash guards in great shape for years to come. Whether you drive a truck, SUV, or sedan, installing your own mud flaps and fender liners is one of the most rewarding DIY automotive jobs you can do.
Now that you have all the information you need, it is time to grab your tools and get to work. Your vehicle will thank you with better protection, a cleaner appearance, and peace of mind every time you hit the road.
Frequently Asked Questions
Do splash guards really make a difference in protecting my car?
Yes, they absolutely do. Splash guards block water, mud, rocks, and debris from hitting your vehicle’s sides and undercarriage. This prevents paint damage, rust, and scratches that can be costly to repair. Even a short drive in the rain can kick up enough debris to cause damage over time.
How long does it take to install splash guards yourself?
Most DIY installations take between 30 and 60 minutes, depending on the type of guard and your vehicle. Bolt-on guards may take longer, while clip-on guards are usually faster. Having all your tools ready before you start helps keep the process smooth and efficient.
Can I install splash guards on any vehicle?
Yes, you can install splash guards on virtually any vehicle. Sedans, SUVs, trucks, and even minivans can benefit from them. The key is choosing the right type and size for your specific vehicle. Custom fit guards offer the best appearance, but universal fit options work well for most cars and trucks.
What is the difference between splash guards and mud flaps?
The terms are often used interchangeably, but there is a slight difference. Splash guards typically refer to the inner fender liners that protect the wheel well. Mud flaps are the outer panels that hang behind the tire. Many people use both terms to describe the same product, but they can refer to different parts of the wheel area.
Are bolt-on or clip-on splash guards better?
It depends on your needs. Bolt-on guards are more secure and durable, making them ideal for trucks and vehicles that drive on rough roads. Clip-on guards are easier to install and work well for everyday driving in sedans and compact SUVs. For most DIY installers, clip-on guards offer the best balance of ease and performance.
How often should I replace my splash guards?
Most splash guards last between three and five years with proper care. Factors like driving conditions, weather, and road quality affect their lifespan. Inspect them every few months for cracks or damage, and replace them when they no longer provide full coverage. Replacing them is a quick and affordable process.