How Do You Remove a Plastic Door Handle Without Damage
Removing a plastic door handle doesn’t have to be scary or complicated. Whether you’re dealing with a broken interior car door handle or a stubborn home door knob, the right approach makes all the difference. This guide walks you through every step to remove a plastic door handle safely and without causing any damage. You’ll learn the tools needed, common mistakes to avoid, and pro tips that save you time and money. By the end, you’ll feel confident tackling this simple DIY repair on your own.
Have you ever stood in front of a door, staring at a plastic handle that just won’t budge? Maybe it’s broken, maybe it’s loose, or maybe you need to replace it entirely. Whatever the reason, removing a plastic door handle can feel intimidating. But here’s the truth: it’s actually one of the easiest DIY tasks you can do. You don’t need to be a mechanic or a carpenter. All you need is the right information, a few basic tools, and a little patience.
In this guide, we’ll show you exactly how do you remove a plastic door handle without damage. We’ll cover every scenario, from car door handles to interior home door knobs. You’ll learn what tools to use, what mistakes to avoid, and how to keep that plastic looking as good as new. Whether you’re a complete beginner or someone who’s done this before but wants to get better at it, you’re in the right place.
The process is simpler than most people think. The biggest hurdle is usually just knowing where to start. Once you understand the basic mechanism behind how a plastic door handle attaches, everything else falls into place. Let’s dive in and break it down step by step.
Key Takeaways
- Right tools matter: Using a trim removal tool and the correct screwdriver prevents scratches and cracks.
- Patience pays off: Rushing the process is the number one cause of plastic damage during handle removal.
- Identify the fastener type first: Screw-secured and clip-fastened handles require different removal techniques.
- Work in a clean, well-lit space: This prevents losing small parts and helps you see what you’re doing.
- Know when to stop: If something feels stuck or cracked, pause and reassess before applying more force.
- Reassembly is just as important: Proper alignment during reinstallation ensures the handle works smoothly for years.
📑 Table of Contents
- Why You Might Need to Remove a Plastic Door Handle
- Tools You’ll Need for the Job
- Step-by-Step Guide to Removing a Plastic Door Handle
- Common Problems and How to Fix Them
- Tips to Prevent Damage During Removal
- Expert Insights: What Professionals Do Differently
- When to Call a Professional
- Reinstalling Your Plastic Door Handle
- Conclusion
Why You Might Need to Remove a Plastic Door Handle
There are several reasons why you’d need to take off a plastic door handle. Understanding your specific situation helps you prepare properly and avoid unnecessary frustration.
Broken or Damaged Handle
A cracked or shattered plastic handle is the most common reason people need to remove one. Over time, plastic becomes brittle, especially in cold weather or under constant use. A broken handle not only looks bad, it can also compromise the security of your door. Replacing it quickly is always the smart move.
Upgrading or Replacing the Handle
Sometimes you just want a change. Maybe you’re upgrading to a different style or color. Or perhaps you found a better-quality replacement that will last longer. Whatever the reason, removing the old handle is always the first step in any upgrade project.
Accessing the Door Mechanism
In automotive situations, you often need to remove the door handle to access the interior door latch or window mechanism. This is common when repairing a power window motor or fixing a stuck door lock. The handle gets in the way, and removing it gives you clear access to the parts you actually need to work on.
Stuck or Loose Handle
A handle that wiggles or feels loose is annoying but also a safety concern. If it comes off while you’re opening or closing the door, that’s a problem. Sometimes tightening the screws isn’t enough, and you need to fully remove the handle to inspect the internal components.
Tools You’ll Need for the Job
Before you start, gather everything you need. Having the right tools on hand makes the process smooth and prevents damage. Here’s what you’ll want in your toolkit.
Essential Tools
- Trim removal tool or plastic pry bar: This is the single most important tool. It slides between the trim and the door panel without scratching the surface.
- Phillips head screwdriver: Most plastic door handles use Phillips screws. Keep a few sizes handy.
- Flathead screwdriver: Useful for prying and for accessing clips that need a flat edge to release.
- Socket set: Some automotive handles use bolt-style fasteners that require a socket.
- Needle-nose pliers: Great for gripping small clips and pulling them out cleanly.
- Flashlight: You’ll need good lighting to see hidden fasteners and clips.
Helpful Extras
- Soft cloth or towel: Place this under the door panel to catch any small parts that fall.
- Small container or zip bag: Keep all screws and clips organized so nothing gets lost.
- Lubricant spray: If any parts are stuck, a little WD-40 or similar spray can help loosen them.
- Replacement fasteners: It’s always smart to have spare clips and screws on hand in case something breaks during removal.
Pro tip: Lay everything out on a clean surface before you begin. Working in a well-lit area with a clear workspace makes a huge difference. You’ll waste less time searching for tools and more time actually getting the job done.
Step-by-Step Guide to Removing a Plastic Door Handle
Now for the part you’ve been waiting for. Here’s the full process for door handle removal without causing any damage to the handle or the door panel. Follow these steps carefully, and you’ll have that handle off in no time.
Step 1: Inspect the Handle and Identify the Fastener Type
Start by looking closely at the handle. Most plastic door handles attach in one of three ways: screws, snap-on clips, or a combination of both. Run your fingers around the base of the handle and look for any visible screws. Check the underside as well. Sometimes screws are hidden under small decorative caps that you can pop off with a flathead screwdriver.
In automotive applications, the handle is usually attached to the door panel through a series of clips and a single or double screw. Home interior handles tend to use exposed screws on the base plate or rosette. Identifying the fastener type before you start is crucial because it determines your entire approach.
Step 2: Remove Any Visible Screws
If you found screws, this is where you remove them. Use the correct size screwdriver and turn counterclockwise. Don’t force it. If a screw feels stuck, apply a little penetrating oil and wait a minute or two before trying again. Place each screw in your container or bag immediately so you don’t lose them.
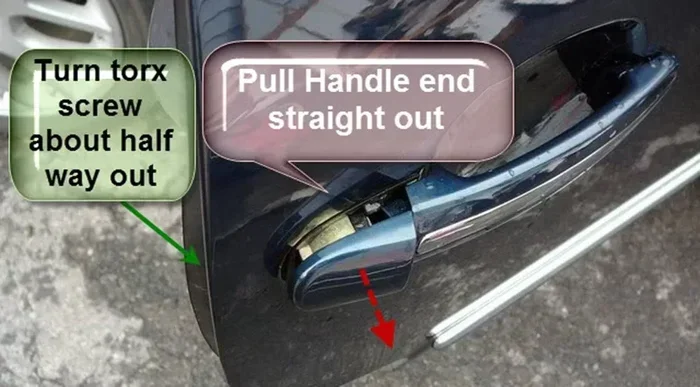
For car door handles, the screw is often located at the base of the handle or behind a small cap on the side panel. Remove the cap gently with a trim tool, take out the screw, and set it aside.
Step 3: Release the Retaining Clips
Once all screws are out, the handle is still held in place by plastic retaining clips. These snap into the door panel or handle housing. To release them, gently wiggle the handle side to side while pulling it toward you. Never pull straight out with force. A gentle rocking motion allows the clips to release one by one without breaking.
If the handle feels very tight, try using your trim removal tool to carefully pry between the handle base and the door panel. Go slowly. Work your way around the perimeter evenly. This distributes the pressure and prevents any single clip from bearing too much force.
Step 4: Disconnect Any Wiring (Automotive Only)
If you’re removing a car door handle, there’s a good chance it has wiring connected to it, especially if the handle includes a power window switch or a central locking button. Before pulling the handle free, locate the wiring connector and gently unplug it. Use your fingernail or a small flat tool to press the locking tab on the connector, then pull it straight out.
Never yank on the wires themselves. The connectors are fragile, and breaking one means buying a replacement. Take your time, and the connector will release easily.
Step 5: Carefully Remove the Handle
With all screws removed, clips released, and wiring disconnected (if applicable), the handle should now come free. Hold it gently and pull it straight out from the door. If it resists, double-check that you haven’t missed any hidden fasteners. Some handles have secondary clips that aren’t obvious at first glance.
Set the handle aside on a soft surface. Place the door panel on your towel to catch any remaining parts. Now you have a clear view of the door mechanism, and the handle is safely removed without a scratch.
Common Problems and How to Fix Them
Even when you follow the steps carefully, things don’t always go perfectly. Here are the most common issues you might encounter and how to handle them like a pro.
Stuck or Seized Screws
Old screws, especially on car door handles exposed to moisture, can rust and seize up. If a screw won’t turn, don’t force it or you’ll strip the head. Apply a penetrating oil like WD-40 or PB Blaster and let it sit for 10 to 15 minutes. Try again gently. If it still won’t budge, you can try gripping the screw head with a rubber band and your screwdriver for extra traction.
Broken Retaining Clips
Plastic clips can snap, especially if they’re old or brittle. If a clip breaks during removal, don’t panic. You can buy replacement clips at any auto parts store or hardware shop for just a few cents. When reinstalling, use the new clip and your handle will be just as secure as before.
Handle Won’t Budge at All
Sometimes a handle is so stuck that wiggling and prying don’t work. This usually means there’s a hidden fastener you haven’t found yet. Look carefully along the sides and bottom of the handle. Use your flashlight to check for any screw heads or clip points you might have missed. In some cases, the entire door panel needs to come off to access the handle mounting points.
Scratches or Marks on the Door Panel
If you accidentally scratch the door panel while prying, don’t worry. Most plastic door panels can be touched up with a matching trim paint pen. For fabric-covered panels, a small fabric repair kit works well. Prevention is always better than cure, though, which is why using a proper trim removal tool makes such a big difference.
Tips to Prevent Damage During Removal
Protecting the handle and the door panel is the whole point of this guide. Here are some practical tips that make a real difference.
- Always use a trim removal tool. Flat-head screwdrivers might seem convenient, but they easily scratch and crack plastic. A dedicated trim tool has a smooth, rounded edge that slides between surfaces without causing damage.
- Go slow and steady. Rushing is the number one cause of broken plastic handles. Gentle, steady pressure always wins over brute force.
- Work in a warm environment. Cold plastic becomes brittle and cracks more easily. If you’re working in a garage in winter, let the car warm up for a while before starting.
- Use a lubricant on tight clips. A small spray of silicone lubricant helps clips release smoothly without snapping.
- Photograph each step. Before you remove anything, take a photo. This gives you a reference point for reassembly and helps you remember how everything was connected.
- Keep small parts contained. Screws and clips are tiny and easy to lose. A magnetic tray or a zip bag keeps them safe and organized.
Expert Insights: What Professionals Do Differently
Automotive technicians and experienced DIYers follow a few habits that set them apart from the average person. Here’s what the pros know about removing plastic door handles that you won’t find on most generic guides.
First, professionals always read the service manual for the specific vehicle or door model. Even though most plastic handles follow a similar design, there are always small variations between manufacturers. A five-minute look at the manual can save you 30 minutes of guesswork.
Second, they never reuse old clips. Plastic clips weaken each time they’re removed and reinstalled. A new clip costs pennies and provides a secure hold. Reusing an old clip is a common reason handles come loose again after a few weeks.
Third, they clean the area before starting. Dust, dirt, and debris can get in the way and make it harder to see what you’re doing. A quick wipe-down with a clean cloth takes seconds and makes the whole process smoother.
Finally, pros know when to stop. If something feels wrong, if a clip is cracking, or if a screw is stripping, they pause and reassess. Forcing through a problem almost always makes it worse. Taking a five-minute break to regroup is never a waste of time.
When to Call a Professional
Most plastic door handle removals are straightforward and well within the capabilities of a DIYer. However, there are situations where it makes sense to bring in a professional.
If the handle is severely cracked or shattered into multiple pieces, removal can become complicated. You don’t want sharp plastic fragments inside the door panel or near the door mechanism. A professional has the tools and experience to handle this safely.
Similarly, if you’ve tried removing the handle and the entire door panel feels loose or damaged, you may have a more serious issue. Door panels are connected to the window mechanism, locks, and wiring. Damaging these components can lead to expensive repairs that are best left to a qualified technician.
Also, if your vehicle is under warranty, attempting DIY removal might void certain coverage. Check your warranty terms before you start any work on the car. When in doubt, a quick visit to a mechanic or dealership saves you from potentially costly mistakes.
Reinstalling Your Plastic Door Handle
Removing the handle is only half the job. Reinstalling it correctly ensures it works smoothly and stays secure for years to come. Here’s a quick overview of the reinstallation process.
Start by reversing the removal steps. If you replaced the handle, make sure the new one matches the old one in size, shape, and mounting points. Align the handle with the door panel and press the retaining clips back into place. You should feel each click as the clips engage.
Replace all screws and tighten them firmly but not overly tight. Over-tightening plastic screws can crack the threads or strip the hole. Reconnect any wiring by pressing the connectors firmly until they click. Test the handle by opening and closing the door several times before you reassemble the door panel.
Finally, check that the handle feels solid and doesn’t wobble. A properly installed handle should feel snug and secure. If there’s any movement, double-check that all clips and screws are in place and fully engaged.
Conclusion
So, how do you remove a plastic door handle without damage? The answer comes down to preparation, patience, and the right approach. Identify your fastener type, gather your tools, work slowly and carefully, and never force anything. Whether you’re removing a car door handle or a home interior door knob, the process follows the same basic principles.
By following this guide, you’ve got everything you need to tackle the job confidently. You’ll save money on professional repairs, learn a valuable DIY skill, and keep your plastic door handles looking great. The next time a handle breaks or needs replacing, you’ll know exactly what to do.
Remember, the key to successful handle removal is gentleness and attention to detail. Take your time, follow the steps, and you’ll get clean results every time. Happy fixing!
Frequently Asked Questions
Can I use a regular screwdriver instead of a trim removal tool?
You can, but it’s not recommended. Regular screwdrivers can easily scratch or crack plastic surfaces. A trim removal tool is specifically designed to slide between surfaces without causing damage. It’s a small investment that saves you from costly repairs and keeps your door panel looking factory fresh.
How long does it take to remove a plastic door handle?
For most people, the process takes between 10 and 20 minutes. If you’re experienced or the handle is straightforward, it can be even faster. If the handle is stuck or has hidden fasteners, it might take a bit longer. The key is not to rush, as patience prevents damage.
What should I do if a screw strips during removal?
If a screw strips, stop turning immediately. Try using a rubber band between the screwdriver and the screw head for extra grip. If that doesn’t work, you can use a screw extractor tool. Avoid drilling out the screw unless you have experience, as this can damage the door panel or handle housing.
Do I need to remove the door panel to take off the handle?
In most cases, you don’t need to remove the entire door panel. Most plastic door handles can be accessed and removed from the outside of the panel. However, in some automotive models, the handle clips are only accessible from behind the panel, which means partial or full panel removal is necessary. Check your specific model before starting.
Are plastic door handle clips universal?
No, plastic door handle clips are not universal. Different manufacturers use different sizes and styles of clips. It’s always best to check your vehicle or door model number and purchase the correct replacement clips. Most auto parts stores can help you find the exact match for your specific handle.
Can I reuse the old plastic clips when reinstalling the handle?
It’s best to use new clips when reinstalling a plastic door handle. Old clips lose their tension over time and may not hold the handle as securely. Replacement clips are inexpensive and widely available. Using new clips ensures a snug, secure fit that lasts for years without the handle becoming loose again.
=== CONCLUSION ===
Removing a plastic door handle without damage is a straightforward task once you know the right steps. From identifying the fastener type to using the proper tools and working with care, every part of the process is manageable for a DIYer at any skill level. You now have a complete guide that covers inspection, removal, troubleshooting, and reinstallation.
The most important takeaway is this: patience and preparation prevent damage. Take your time, gather your tools, and follow each step carefully. Whether you’re working on a car door handle or a home interior knob, the principles are the same. Handle with care, and your plastic door handle will come off clean and ready for replacement or repair.
Now that you know exactly how do you remove a plastic door handle without damage, you have the confidence to tackle this project on your own. Grab your tools, find a well-lit workspace, and get started. You’ll be surprised how satisfying it feels to complete a repair with your own hands and do it right the first time.