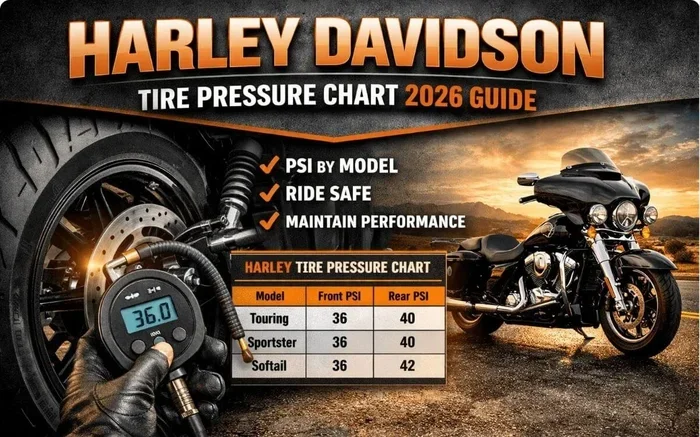
Harley-Davidson Tire Pressure Chart – Quick Reference
Our Harley-Davidson Tire Pressure Chart gives you the exact pressure numbers you need for every model. Keeping your tires at the right pressure boosts safety, handling, and fuel efficiency. Whether you ride a Sportster or a Road Glide, this guide covers all the essential tire pressure info you need.
Riding a Harley-Davidson is one of life’s great pleasures. The open road, the rumble of the engine, and the freedom of the highway all come together in a single ride. But before you twist that throttle, there is one thing you must check. Your Harley-Davidson Tire Pressure Chart holds the key to a safe and smooth ride.
Tire pressure might not be the most exciting topic. But it is one of the most important parts of Harley-Davidson maintenance. Wrong pressure leads to poor handling. It can cause uneven tire wear. And in worst cases, it can lead to a blowout on the highway. This guide breaks down everything you need to know about your motorcycle tire pressure settings.
We will walk you through the tire pressure chart for different models. We will share practical tips on how to check your pressure correctly. And we will highlight common mistakes that even experienced riders make. By the end, you will know exactly how to keep your tires in top shape. Let us get into it.
Key Takeaways
- Correct pressure saves lives: Proper tire pressure is the simplest way to improve your ride safety and handling.
- Every model is different: Your Harley-Davidson Tire Pressure Chart will vary based on the bike model and riding style.
- Check pressure when cold: Always measure tire pressure before riding for the most accurate reading.
- Front and rear differ: Most Harley models need different pressure levels for the front and rear tires.
- Small changes matter: Even a few PSI off can affect your bike’s handling and tire wear.
- Regular checks are key: Make tire pressure checks part of your routine Harley-Davidson maintenance schedule.
📑 Table of Contents
- Why Tire Pressure Matters for Your Harley-Davidson
- Understanding the Harley-Davidson Tire Pressure Chart
- Tire Pressure by Model
- How to Check Your Tire Pressure Correctly
- Common Tire Pressure Mistakes and How to Avoid Them
- Expert Tips for Maintaining Optimal Tire Pressure
- Key Takeaways
- Frequently Asked Questions
- Conclusion
Why Tire Pressure Matters for Your Harley-Davidson
Your tires are the only part of your bike that touches the road. Everything else is just metal, chrome, and horsepower. So it makes sense that tire pressure is super important. When your tires are at the right pressure, your bike handles better. It rides smoother. And it uses less fuel.
Here are the main reasons why motorcycle tire pressure matters so much:
- Safety: Under-inflated tires can overheat. Over-inflated tires have less grip. Both situations are dangerous.
- Handling: The right pressure gives you the best control. Your bike will corner and brake the way it should.
- Tire Life: Correct pressure stops your tires from wearing out too fast. You save money in the long run.
- Fuel Efficiency: Properly inflated tires reduce rolling resistance. That means better gas mileage on long rides.
- Ride Comfort: The right pressure absorbs road bumps better. Your ride feels more comfortable and less jarring.
Think of your tire pressure settings like the foundation of a house. If the foundation is off, everything else suffers. The same goes for your Harley. A few PSI off can change how your bike feels on the road.
What Happens When Pressure Is Too Low
Under-inflated tires are one of the most common problems riders face. When the pressure drops too low, the tire sidewall flexes more than it should. This creates extra heat. The heat breaks down the rubber faster. You will notice your tires wearing out on the outer edges of the tread.
Low pressure also makes your bike feel sluggish. The steering feels heavy. And in extreme cases, the tire can come off the rim. That is a scary situation at any speed. Always check your Harley-Davidson Tire Pressure Chart and stay within the recommended range.
What Happens When Pressure Is Too High
Over-inflated tires are just as bad. Too much air makes the tire ride on the center of the tread. The contact patch shrinks. That means less grip on the road. Your braking distance increases. And your ride gets harsher because the tire cannot absorb bumps well.
Over-inflation also makes your tires more vulnerable to punctures. A small nail or piece of debris that would normally bounce off can now cause a flat. Keep your tire pressure monitoring in check and avoid overfilling.
Understanding the Harley-Davidson Tire Pressure Chart
A tire pressure chart is a simple reference tool. It tells you the exact PSI (pounds per square inch) your tires need. Every Harley-Davidson model has its own recommended numbers. The chart usually lists front and rear tire pressures separately.
You can find the Harley-Davidson Tire Pressure Chart in a few places:
- Owner’s Manual: This is the most reliable source. Check the tire section for your specific model.
- Frame Sticker: Many Harleys have a sticker on the frame near the steering head. It lists the recommended pressure.
- Online Resources: Harley-Davidson’s official website has tire pressure charts for all current models.
The numbers on the chart are based on cold tire pressure. That means you should check your tires before riding. The tires cool down after sitting for a few hours. This gives you the most accurate reading.
Cold Tire Pressure vs. Hot Tire Pressure
This is a concept many riders misunderstand. Cold tire pressure is the pressure when the tires are at ambient temperature. You measure it before you ride. Hot tire pressure is what you get after riding. The air inside the tire heats up and expands. This raises the PSI reading.
Always use the cold pressure number from your tire pressure chart. If you check your tires after a ride, the reading will be higher. That does not mean you have too much air. It is just the natural result of heat expansion.
As a rule of thumb, hot pressure runs about 2 to 4 PSI higher than cold pressure. But this varies based on riding conditions, distance, and speed. Never let hot pressure readings confuse you into letting air out.
How to Read Your Tire Pressure Chart
Reading a Harley-Davidson Tire Pressure Chart is straightforward. Here is what to look for:
- Model Name: Find your specific Harley model on the chart.
- Tire Size: Note the front and rear tire sizes listed.
- Front PSI: This is the recommended pressure for the front tire.
- Rear PSI: This is the recommended pressure for the rear tire.
- Load Conditions: Some charts list different pressures for solo riding versus carrying a passenger or cargo.
For example, a Harley-Davidson Street Glide might show 36 PSI in front and 42 PSI in rear for solo riding. When loaded with a passenger, the rear pressure might go up to 45 PSI. Always follow the chart for your current riding conditions.
Tire Pressure by Model
Not all Harleys are the same. Different models need different tire pressure settings. Here is a closer look at some popular Harley-Davidson models and their recommended tire pressures.
Sportster Models
The Sportster line is one of the most iconic Harley families. These bikes have a lighter frame and a more upright riding position. Their motorcycle tire pressure requirements reflect that lighter build.
- Iron 883: Front 30 PSI, Rear 36 PSI
- Forty-Eight: Front 30 PSI, Rear 36 PSI
- Forty-Eight Special: Front 30 PSI, Rear 36 PSI
Sportsters are great for new riders. But even these lighter bikes need proper tire inflation. Do not skip your pressure checks just because the bike is smaller.
Touring Models
Touring bikes like the Road Glide and Street Glide are built for long-distance riding. They carry more weight and need higher tire pressures. Always refer to your Harley-Davidson Tire Pressure Chart when loading up for a trip.
- Street Glide: Front 36 PSI, Rear 42 PSI (solo)
- Road Glide: Front 36 PSI, Rear 42 PSI (solo)
- Electra Glide: Front 36 PSI, Rear 42 PSI (solo)
When you add a passenger or saddlebags, the rear pressure often increases. Check your owner’s manual for the loaded pressure settings. This is critical for road readiness on long tours.
Softail Models
Softails combine classic looks with modern performance. Their tire pressure needs fall somewhere between the Sportsters and the touring models.
- Fat Boy: Front 33 PSI, Rear 36 PSI
- Low Rider ST: Front 33 PSI, Rear 36 PSI
- Heritage Classic: Front 33 PSI, Rear 36 PSI
Softails are versatile bikes. Whether you are cruising the city or heading out on a weekend ride, keeping your tire pressure right makes a big difference in how the bike feels.
How to Check Your Tire Pressure Correctly
Knowing your tire pressure chart numbers is only half the battle. You also need to know how to check your pressure the right way. A wrong reading can trick you into thinking your tires are fine when they are not.
Tools You Will Need
- Tire Pressure Gauge: A good digital or dial gauge gives the most accurate reading. Stick gauges from gas stations work in a pinch but are less precise.
- Tire Pressure Monitor: Some riders use TPMS devices that give real-time pressure readings. These are great for long trips.
- Air Compressor: You need a way to add air if your pressure is low. A small portable compressor works well for home use.
Step-by-Step Guide
- Check When Cold: Wait at least three hours after riding. Morning is the best time to check.
- Remove the Valve Cap: Unscrew the small cap on the tire valve stem.
- Press the Gauge Firmly: Push your tire pressure gauge onto the valve stem. You will hear a brief hiss of air. That is normal.
- Read the PSI: Look at the gauge and note the pressure reading.
- Compare to the Chart: Match your reading to the Harley-Davidson Tire Pressure Chart for your model.
- Adjust as Needed: Add air if the pressure is low. Let a little out if it is too high.
- Replace the Valve Cap: Put the cap back on. It keeps dirt and moisture out of the valve.
Make this a habit. Check your motorcycle tire pressure at least once a week. And always check before a long ride. A quick two-minute check can save you from a lot of trouble on the road.
Quick Tips for Accurate Readings
- Use the same gauge every time for consistency.
- Do not rely on gas station air pumps. They are often inaccurate.
- Check all tires, including the spare if you carry one.
- Record your pressure readings in a small notebook or phone app.
- Replace valve stems every few years. Old stems can leak air slowly.
Common Tire Pressure Mistakes and How to Avoid Them
Even experienced riders make mistakes with their tire pressure. Here are the most common ones and how you can avoid them.
Mistake 1: Only Checking Pressure When It Looks Low
Tire pressure changes gradually. You may not notice a slow leak just by looking at the tire. By the time the tire looks flat, it may already be damaged. Always check your pressure with a gauge. Do not rely on visual inspection alone.
Mistake 2: Using the Wrong PSI Numbers
Every Harley model has different tire pressure settings. Do not assume your friend’s Sportster numbers work for your Road Glide. Always go by your own Harley-Davidson Tire Pressure Chart. The wrong PSI can affect handling and safety.
Mistake 3: Ignoring Temperature Changes
Air pressure inside tires drops in cold weather. If you ride in winter, your pressure may be lower than in summer. Check your pressure more often during seasonal changes. Adjust accordingly based on your tire pressure chart.
Mistake 4: Forgetting About the Rear Tire
Many riders focus on the front tire and forget the rear. The rear tire carries more weight. It also wears out faster. Always check both tires. Use the correct PSI for each side as listed in your chart.
Mistake 5: Overlooking Tire Wear Patterns
Your tire pressure affects how the tire wears. Under-inflated tires wear on the outer edges. Over-inflated tires wear in the center. If you notice uneven tire wear patterns, check your pressure first. It might be the simple fix you need.
Expert Tips for Maintaining Optimal Tire Pressure
Keeping your tire pressure right is not just about the numbers. It is about building good habits. Here are some expert tips that will help you stay on top of your Harley’s tire health.
Invest in a Quality Tire Pressure Gauge
A cheap stick gauge gives you a rough idea. But a digital or dial gauge gives you precision. For a few dollars more, you get accurate readings every time. This is one of the best investments you can make for Harley-Davidson maintenance.
Set Up a Tire Pressure Schedule
Do not rely on memory. Set a reminder on your phone to check your motorcycle tire pressure every Sunday morning. A regular schedule makes it second nature. After a few weeks, you will not even think about it.
Understand Your Riding Style
Do you carry a passenger often? Do you load up with saddlebags? Do you ride mostly on highways or city streets? Your riding style affects your optimal tire pressure. The tire pressure chart often has different numbers for different load conditions. Know your riding style and use the right numbers.
Replace Tires When Needed
Even with perfect pressure, tires wear out over time. Check the tread depth regularly. Replace your tires when the tread gets too low. New tires with correct pressure give you the best grip and handling. They also make your bike handling feel like new again.
Keep a Tire Pressure Log
This might sound like overkill. But a simple log helps you spot trends. If your pressure keeps dropping, you might have a slow leak. Catching a leak early saves you from a surprise flat. Write down your readings each time you check.
Get Professional Help When Needed
If you are unsure about your tire pressure monitoring or tire health, visit a Harley-Davidson dealer or a trusted mechanic. They can check your tires, valves, and overall tire condition. A professional inspection gives you peace of mind before a big ride.
Key Takeaways
- Correct pressure saves lives: Proper tire pressure is the simplest way to improve your ride safety and handling.
- Every model is different: Your Harley-Davidson Tire Pressure Chart will vary based on the bike model and riding style.
- Check pressure when cold: Always measure tire pressure before riding for the most accurate reading.
- Front and rear differ: Most Harley models need different pressure levels for the front and rear tires.
- Small changes matter: Even a few PSI off can affect your bike’s handling and tire wear.
- Regular checks are key: Make tire pressure checks part of your routine Harley-Davidson maintenance schedule.
- Invest in good tools: A quality tire pressure gauge and monitor make a big difference in accuracy and convenience.
Frequently Asked Questions
What PSI should my Harley-Davidson tires be at?
The right PSI depends on your specific Harley model. Check your owner’s manual or the Harley-Davidson Tire Pressure Chart. Most models range from 30 PSI in the front to 42 PSI in the rear. Always check the chart for your exact model and riding conditions.
How often should I check my Harley-Davidson tire pressure?
You should check your motorcycle tire pressure at least once a week. Also check before any long ride. Tire pressure can change slowly over time, especially with temperature shifts. A quick weekly check keeps you safe and your tires lasting longer.
Can I use the same tire pressure for solo and loaded riding?
No. When you carry a passenger or load up with gear, your rear tire needs more support. The tire pressure chart often lists different PSI for solo and loaded conditions. Always use the correct pressure for your current load to maintain safe handling.
What happens if I ride with low tire pressure?
Low tire pressure causes the sidewall to flex too much. This creates excess heat, which leads to uneven tire wear and reduced handling. In serious cases, it can cause a blowout. Always keep your tires at the right tire inflation level listed in your Harley-Davidson Tire Pressure Chart.
Should I check my tire pressure when the tires are hot or cold?
Always check cold tire pressure before riding. Hot tires have higher readings due to air expansion. The tire pressure chart numbers are based on cold measurements. Checking when cold gives you the most accurate and safe reading.
Do I need a tire pressure monitoring system for my Harley?
A TPMS is not required, but it is very helpful. It gives you real-time tire pressure monitoring on the go. This is especially useful for long tours and highway riding. It alerts you to pressure drops before they become a safety issue.
Conclusion
Your Harley-Davidson Tire Pressure Chart is one of the most valuable tools you own. It keeps you safe. It improves your ride. And it saves you money on tire replacements. Taking a few minutes each week to check your pressure is a small effort with big rewards.
Do not skip this simple step. Whether you are a seasoned rider or just starting out, proper tire pressure makes every ride better. Grab your gauge. Check your numbers. And hit the road with confidence. Your Harley deserves the best care you can give it, and that starts with the right tire pressure.