Harley-Davidson Instrument Panel Lights Explained Guide
Understanding your Harley-Davidson instrument panel lights is essential for every rider. This guide breaks down each dashboard symbol, warning light, and indicator so you can diagnose problems fast. You will learn how to read your instrument cluster, troubleshoot common issues, and maintain your lights for long-term reliability. Whether you ride a Softail, Sportster, or Road Glide, this guide covers it all.
Your Harley-Davidson instrument panel lights tell you a story every time you turn the key. These small but mighty symbols and glows on your dashboard communicate what is happening under the hood. Ignoring them can lead to bigger problems down the road. Understanding what each light means puts you in control of your ride. This guide walks you through everything you need to know about your Harley-Davidson instrument panel lights.
Whether you are a first-time Harley owner or a seasoned rider with thousands of miles, knowing your dashboard is critical. The Harley-Davidson instrument cluster is more than just a speedometer and tachometer. It is a communication system between your bike and you. When a light pops up, it is trying to tell you something important. Let us break it all down so you can ride with confidence and stay safe.
Every motorcycle warning light has a color code and a specific meaning. Red lights usually mean stop and check immediately. Yellow or amber lights suggest something needs attention soon. Green and blue lights simply let you know a system is active. Once you understand this basic system, reading your dashboard becomes second nature. Let us dive into the details of your Harley-Davidson dashboard lights and what they mean for your ride.
Key Takeaways
- Know Your Lights: Each Harley-Davidson instrument panel light serves a specific purpose, from engine warnings to turn signals.
- Safety First: Recognizing red warning lights immediately can prevent costly damage and keep you safe on the road.
- Regular Maintenance Matters: Keeping your dashboard lights clean and functional extends their lifespan and improves visibility.
- Troubleshooting Is Easier Than You Think: Most Harley-Davidson dashboard light issues have simple fixes you can do at home.
- Know When to Call a Pro: Some electrical issues require a professional mechanic, especially complex wiring problems.
- Model-Specific Differences Exist: Different Harley-Davidson models may have unique indicator lights and cluster designs.
📑 Table of Contents
- Understanding Your Harley-Davidson Instrument Panel Lights
- Common Harley-Davidson Dashboard Warning Lights and What They Mean
- How to Read Your Harley-Davidson Instrument Cluster
- Troubleshooting Harley-Davidson Panel Light Issues
- Maintaining Your Harley-Davidson Dashboard Lights
- When to Seek Professional Help for Harley Instrument Panel Lights
- Model-Specific Differences in Harley-Davidson Instrument Panel Lights
- Key Takeaways
- Conclusion
Understanding Your Harley-Davidson Instrument Panel Lights
The Harley-Davidson instrument panel lights are grouped into categories based on what system they monitor. Each category plays a role in keeping your motorcycle running smoothly and safely. Let us look at the main groups so you can quickly identify what is on your dash.
Engine and Performance Warning Lights
These lights monitor the core systems of your bike. The engine light, oil pressure gauge, and temperature indicator fall into this group. When you see a red engine symbol, it could mean trouble with your motorcycle electrical system. A flashing check engine light on a Harley-Davidson should never be ignored. These dashboard warning symbols are designed to alert you before a small issue becomes a big repair bill.
The oil pressure light is one of the most critical Harley-Davidson dashboard lights. If it comes on, pull over safely and check your oil level immediately. Low oil pressure can destroy an engine in minutes. The temperature gauge works similarly. If your engine temperature gauge reads too high, let the engine cool down before continuing. These are not lights you want to gamble with.
Electrical System Indicators
Your Harley-Davidson has several lights dedicated to the electrical system. The battery charge indicator is one you will see most often. When the battery light stays on while riding, it suggests a charging problem. This could mean your alternator is failing or your wiring has an issue. The battery charge indicator is a yellow or red light shaped like a battery. If you see it, get to a mechanic soon.
Other electrical indicators include the headlight-on symbol and the turn signal flasher. These are simple but easy to overlook. The turn signal indicator blinks on the Harley-Davidson instrument cluster to remind you a signal is still active. Many riders forget to cancel their turn signal, and this light helps prevent accidents. It is a small detail that makes a big difference.
Safety and Status Lights
Safety lights on your dashboard include the high beam indicator, neutral light, and side stand indicator. The high beam light shows a blue symbol when your headlights are on full beam. The neutral light confirms your transmission is in neutral, which is helpful during starts. The side stand light reminds you if your kickstand is still down. These motorcycle indicator lights keep you aware of your bike’s current status without thinking too hard about it.
The side stand indicator is especially important. Riding away with the kickstand down can cause a serious accident. If this light stays on while you are moving, check your kickstand immediately. These dashboard gauge lights are simple reminders that protect you and your bike.
Common Harley-Davidson Dashboard Warning Lights and What They Mean
Every Harley-Davidson instrument panel lights guide should cover the most common warning symbols riders encounter. Here is a breakdown of the lights you are most likely to see on your dash.
Red Warning Lights
Red lights demand immediate attention. They signal serious problems that could damage your bike or put you in danger. The most common red lights include:
- Oil Pressure Light: Indicates low oil pressure. Stop and check immediately.
- Engine Temperature Light: Signals overheating. Pull over and let the engine cool.
- Battery/Charging Light: Suggests a charging system failure. Limit riding and seek help.
- Brake System Light: Warns of low brake fluid or a brake system issue.
- Check Engine Light: Indicates an engine fault detected by the ECU.
If any red light comes on, do not keep riding. Pull over in a safe spot and assess the situation. Continuing to ride with a red warning light can result in engine failure or a dangerous breakdown on the road.
Yellow or Amber Warning Lights
Amber lights mean something needs attention but it is not an immediate emergency. Common yellow motorcycle warning lights include:
- ABS Light: The anti-lock braking system has a fault. Brakes still work, but ABS may not engage.
- Traction Control Light: The traction system has an issue. Ride cautiously in wet conditions.
- Turn Signal Indicator: A turn signal is still active or has a bulb out.
- Service Reminder Light: It is time for scheduled maintenance or a service check.
You can usually continue riding with an amber light, but get it checked soon. These Harley-Davidson warning symbols are designed to give you early notice before a problem becomes critical.
Green and Blue Status Lights
Green and blue lights are purely informational. They tell you a system is active or working correctly. Examples include:
- High Beam Indicator: Blue symbol showing your headlights are on high beam.
- Turn Signal Flasher: Green arrow blinking to show an active turn signal.
- Neutral Light: Green light confirming the bike is in neutral.
- Engine Running Indicator: Shows the ignition is on and the engine is running.
These lights are not warnings. They simply confirm that a system is engaged. If a green or blue light behaves strangely, such as staying on when it should not, it may still indicate a sensor issue worth investigating.
How to Read Your Harley-Davidson Instrument Cluster
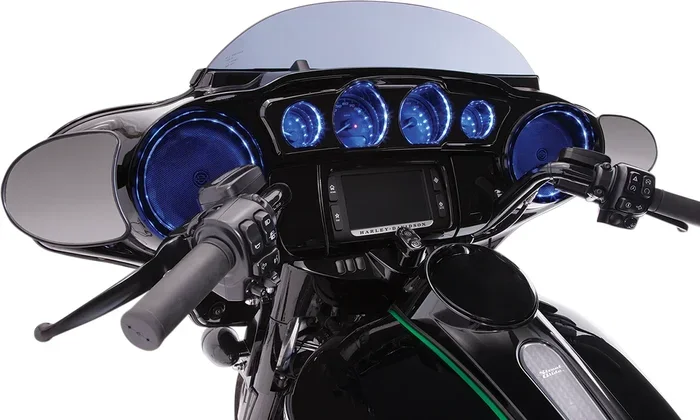
The Harley-Davidson instrument cluster is the centerpiece of your dashboard. It houses the speedometer, tachometer, and all your indicator lights. Knowing how to read the full cluster helps you become a more informed rider. Let us walk through the key components.
Your speedometer shows how fast you are going in miles per hour. The tachometer measures engine RPMs. Together, these gauges tell you how your bike is performing. The speedometer warning light may flash if you exceed a certain speed or if the speed sensor has an issue. This is common on older Harley models and usually easy to fix.
Below the main gauges, you will find smaller indicator lights. Each one corresponds to a specific system. The layout may vary slightly depending on your model. A 2020 Street Glide, for example, has a more advanced digital cluster than a classic Sportster. However, the basic principles remain the same across all Harley-Davidson models.
Understanding the cluster also means knowing where each light sits. Most Harley-Davidson instruments group related lights together. Engine warnings are typically in the center. Electrical indicators are on the left. Safety and status lights are on the right. Once you memorize this layout, reading your dashboard becomes quick and effortless.
LED vs. Traditional Bulb Dashboard Lights
Modern Harleys use LED technology for their dashboard gauge lights. LEDs are brighter, last longer, and use less power than traditional bulbs. Older models may still use incandescent bulbs. If you own a vintage Harley, you might notice bulbs dimming or flickering over time. This is a common issue and usually easy to fix with a simple replacement.
LED lights on newer models can sometimes appear too bright or too dim depending on the ambient lighting. Some riders install dimmer switches or replace LEDs with adjustable brightness options. This is a popular motorcycle maintenance upgrade that improves visibility at night without blinding you.
Troubleshooting Harley-Davidson Panel Light Issues
Not all dashboard light problems are caused by a broken bulb. Sometimes the issue lies deeper in the motorcycle electrical system. Here are the most common problems riders face with their Harley-Davidson instrument panel lights and how to fix them.
Lights That Stay On Constantly
If a light stays on when it should turn off, the first thing to check is the simple stuff. Is the side stand down? Is the turn signal still blinking? Sometimes the answer is obvious. If none of these explain the light, move on to the next step.
Check the wiring connections behind the instrument cluster. Loose wires are a common cause of persistent dashboard lights. A corroded connector can also trick your system into thinking there is a fault. Use a multimeter to test the voltage at each connection point. This is a basic Harley-Davidson troubleshooting step that many riders skip.
Lights That Flicker or Dim
Flickering lights usually point to a power supply issue. The battery might be weak or the voltage regulator could be failing. Start by testing your battery with a charger. If the battery holds a charge, move on to the voltage regulator. A failing regulator causes inconsistent power delivery to the dashboard lights.
Another cause of flickering is a loose ground wire. The ground wire connects the electrical system to the frame. If it is loose or corroded, lights can flicker or behave erratically. Cleaning the ground connection with a wire brush often solves this problem quickly.
Lights That Do Not Work At All
If an entire section of your dashboard goes dark, check the fuse box first. A blown fuse is the most common reason for total light failure. Harley-Davidson models have easily accessible fuse boxes, usually under the seat or near the battery. Replace the blown fuse with one of the same amperage rating.
If the fuse keeps blowing, there is a deeper short circuit in the Harley-Davidson wiring. This requires professional diagnosis. Do not keep replacing fuses without finding the root cause. A short circuit can damage other electrical components if left unaddressed.
Maintaining Your Harley-Davidson Dashboard Lights
Prevention is always better than repair when it comes to your Harley-Davidson instrument panel lights. Regular maintenance keeps your dashboard functioning properly and extends the life of every bulb and LED. Here is a simple maintenance routine every Harley owner should follow.
Regular Cleaning and Inspection
Dust and grime build up on your dashboard over time. This buildup can dim your lights and make them harder to see at night. Use a soft microfiber cloth and a gentle cleaner to wipe down your instrument cluster weekly. Avoid harsh chemicals that can damage the plastic lens or the gauge face.
During cleaning, inspect each light for cracks or discoloration. A cracked lens lets moisture in, which can short out the bulb or LED. Replace damaged lens covers immediately. This is a small motorcycle maintenance task that prevents bigger problems later.
Bulb and LED Replacement Tips
Replacing dashboard bulbs on a Harley-Davidson is straightforward. Start by removing the instrument cluster bezel. Each bulb pulls out of its socket with a gentle twist. Match the old bulb to the new one by size and wattage. LED replacements are drop-in for most models, but always double-check compatibility first.
When replacing LEDs, choose quality bulbs from reputable brands. Cheap LEDs can flicker or burn out quickly. A good LED bulb lasts thousands of hours and provides consistent brightness. This is one of those small upgrades that makes a noticeable difference in your riding experience.
Wiring and Connector Maintenance
Your Harley-Davidson wiring connects every light on the dashboard to the main electrical system. Over time, connectors can corrode, especially if you ride in wet or salty conditions. Spray electrical contact cleaner on all connector points once or twice a year. This prevents corrosion and ensures a strong electrical connection.
Check for any frayed wires near the instrument cluster. Wires that rub against the frame can wear down and eventually break. Use wire loom or protective tape to shield vulnerable wires. This simple step saves you from unexpected electrical failures on the road.
When to Seek Professional Help for Harley Instrument Panel Lights
Most Harley-Davidson instrument panel lights issues can be solved with basic troubleshooting. But some problems need a professional touch. Knowing when to call a mechanic saves you time, money, and frustration.
Complex Electrical Diagnostics
If you have checked fuses, bulbs, and wiring but a light still does not work, the problem may be deeper. The motorcycle electrical system includes sensors, modules, and computers that require specialized diagnostic tools. A professional mechanic can hook up a diagnostic scanner to read error codes from your Harley’s ECU.
This is especially true for newer models with advanced digital clusters. These systems are more complex and less forgiving of DIY repairs. If you are not comfortable working with electronics, trust a certified Harley-Davidson technician.
Persistent Warning Lights After Repairs
If you have replaced a bulb or fixed a wire but a warning light still stays on, the sensor itself may be faulty. Dashboard sensors can fail over time and need replacement. A mechanic can test each sensor and confirm whether it is the sensor or the wiring causing the issue.
Do not ignore a persistent light, even after you have done your own repairs. Some Harley-Davidson warning symbols are tied to safety systems like ABS and traction control. A faulty sensor in these systems compromises your safety on the road. Always get persistent lights professionally diagnosed.
Warranty Considerations
If your Harley is still under warranty, be cautious about DIY electrical repairs. Some modifications or repairs can void your warranty. Before opening up your instrument cluster, check with your dealer about what is covered. Many warranty issues related to dashboard gauge lights are handled at no cost to you if the bike is still under the factory warranty period.
Model-Specific Differences in Harley-Davidson Instrument Panel Lights
Not all Harleys are created equal when it comes to dashboard lights. Different models have different clusters, different numbers of indicators, and different warning systems. Here is a quick look at how some popular models differ.
Sportster Models: These classic Harleys have a simpler instrument cluster with fewer lights. The dashboard is analog-focused with basic warning indicators. Sportster owners should pay close attention to the oil pressure and temperature lights since these bikes have air-cooled engines.
Softail Models: Softails feature a more modern instrument cluster with a wider range of indicator lights. The digital display on newer Softail models includes additional status indicators that older models do not have.
Touring Models (Road Glide, Street Glide): These bikes have the most advanced instrument panels. The BOOM! Box infotainment system includes multiple display screens with detailed warning indicators. Touring riders should familiarize themselves with the full menu of Harley-Davidson dashboard lights specific to their model.
Always refer to your owner’s manual for model-specific details. The manual lists every indicator light and its exact meaning. It is the best resource for understanding your unique Harley-Davidson instrument panel lights setup.
Key Takeaways
- Know Your Lights: Each Harley-Davidson instrument panel light serves a specific purpose, from engine warnings to turn signals.
- Safety First: Recognizing red warning lights immediately can prevent costly damage and keep you safe on the road.
- Regular Maintenance Matters: Keeping your dashboard lights clean and functional extends their lifespan and improves visibility.
- Troubleshooting Is Easier Than You Think: Most Harley-Davidson dashboard light issues have simple fixes you can do at home.
- Know When to Call a Pro: Some electrical issues require a professional mechanic, especially complex wiring problems.
- Model-Specific Differences Exist: Different Harley-Davidson models may have unique indicator lights and cluster designs.
Conclusion
Your Harley-Davidson instrument panel lights are more than just small glowing symbols on your dash. They are your first line of defense against mechanical failures and safety issues. Taking the time to understand each light, what it means, and how to respond to it makes you a smarter and safer rider.
From red engine warnings to green status indicators, every light on your Harley-Davidson instrument cluster has a purpose. Regular maintenance, simple troubleshooting, and knowing when to call a professional will keep your dashboard functioning at its best. The more familiar you become with your dashboard, the more confident you will feel every time you hit the open road.
Ride safe, stay aware, and let those lights guide you. Your Harley-Davidson was built to be ridden, and a well-maintained instrument panel ensures every ride is as smooth and enjoyable as it should be. Keep this guide handy, share it with fellow riders, and always pay attention to what your dashboard is trying to tell you.
Frequently Asked Questions
What do the red lights on my Harley-Davidson dashboard mean?
Red lights on your Harley-Davidson instrument panel lights indicate serious problems that need immediate attention. These include oil pressure warnings, engine overheating alerts, and brake system faults. If you see a red light, pull over safely and address the issue before continuing to ride.
How often should I replace my Harley-Davidson dashboard bulbs?
Traditional bulbs may need replacement every 1,000 to 2,000 hours of riding. LED dashboard lights can last 10,000 hours or more. Check your lights regularly and replace any that are dimming or flickering to maintain clear visibility of your dashboard gauge lights.
Can a dead battery cause Harley-Davidson dashboard lights to malfunction?
Yes, a weak or dead battery can cause flickering, dimming, or complete failure of your Harley-Davidson dashboard lights. The electrical system relies on a steady power supply. If your battery is not holding a charge, it affects every electrical component including your instrument panel.
Why is my check engine light on but the bike seems fine?
A check engine light can come on due to a minor sensor issue or a loose gas cap. However, even if the bike feels fine, you should have the code read by a mechanic. Ignoring the light can lead to bigger problems with your motorcycle electrical system over time.
Are Harley-Davidson dashboard lights the same across all models?
No, different models have different instrument clusters and indicator setups. Touring models have more advanced digital displays while classic models have simpler analog clusters. Always refer to your specific model’s owner manual for the exact layout and meaning of each light on your Harley-Davidson instrument panel lights system.
Can I upgrade my Harley-Davidson dashboard lights to LED?
Yes, upgrading to LED is a popular motorcycle maintenance improvement. LEDs are brighter, last longer, and use less power. Most Harley-Davidson models support LED replacements, but always verify compatibility with your specific model and year before purchasing replacement bulbs.