Do I Need Primer for a Touch-Up Pen Heres the Answer
Using primer before a touch-up pen is not always necessary, but it can make a big difference depending on the size of the damage and your car paint type. This guide breaks down exactly when primer helps, when you can skip it, and how to apply it correctly for a smooth, long-lasting car scratch repair that looks professional.
Key Takeaways
- Primer is not always required: Small chips and shallow scratches often heal well without it.
- Bare metal or deep scratches need primer: It creates a bonding layer that prevents rust and improves paint adhesion.
- Surface prep matters more than you think: Cleaning and sanding the area properly makes any touch-up job last longer.
- Not all primers are the same: Self-etching primer works best for bare metal, while standard primer suits light damage.
- Skipping primer can lead to rust: Especially on older cars or areas where the clear coat is damaged.
- Follow the right steps: Clean, sand, prime (if needed), paint, and seal for the best finish.
📑 Table of Contents
- Do You Really Need Primer for a Touch-Up Pen?
- What Exactly Does Primer Do?
- When You Need Primer for a Touch-Up Pen
- When You Can Skip Primer for a Touch-Up Pen
- Step-by-Step: How to Apply Primer with a Touch-Up Pen
- Common Mistakes People Make with Touch-Up Pens
- Expert Insights on Touch-Up Pen Primers
- Comparing Primer vs. No Primer for Touch-Up Repairs
- How to Choose the Right Primer for Your Touch-Up Pen
- Quick Tips for the Best Touch-Up Results
- Final Thoughts on Primer for Touch-Up Pens
Do You Really Need Primer for a Touch-Up Pen?
If you have ever looked at a small scratch or chip on your car and wondered whether you need primer, you are not alone. The question do I need primer for a touch-up pen comes up a lot among car owners. The short answer is: it depends. Sometimes primer is essential. Other times, it is completely unnecessary.
In this guide, we will walk you through everything you need to know. We will cover when primer helps, when you can skip it, and exactly how to apply it the right way. By the end, you will feel confident about your next automotive touch-up project.
Car paint is more complex than most people realize. It has multiple layers. Each layer serves a specific purpose. Understanding these layers makes the primer decision much easier. So let us dive in and break it all down.
Understanding Your Car Paint Layers
Your car has three main paint layers. The first is the base coat. This is the colored layer you see. The second is the clear coat. It sits on top and protects the color. The third is the primer. It goes on bare metal or plastic to help the paint stick.
When you get a scratch, you might damage one, two, or all three layers. A light surface scratch only hits the clear coat. A deep scratch can go down to the primer or even the metal beneath. The depth of the damage determines whether you need primer for a touch-up pen.
Think of it like a wall in your house. If you just need a fresh coat of paint, you skip the primer. But if the wall has bare drywall, you need that base coat first. The same logic applies to your car.
What Exactly Does Primer Do?
Primer serves several important functions in any paint correction job. Let us look at what it actually does so you can understand why it matters.
Adhesion: Primer helps the touch-up paint bond to the surface. Without it, the paint may peel or flake over time. This is especially true on plastic or bare metal surfaces.
Rust Prevention: If your scratch has reached the metal, primer acts as a barrier. It stops moisture from reaching the bare metal. This is crucial for rust prevention on older vehicles or cars exposed to harsh weather.
Smooth Finish: Primer fills in small imperfections. It creates an even surface for the touch-up paint to sit on. This leads to a smoother, more professional-looking result.
Color Accuracy: Some primers help the true color show through. Without primer, a dark color might look lighter on a light base. The primer ensures your color match stays accurate.
So primer is not just optional filler. It plays a real role in the durability and appearance of your repair. But that does not mean you always need it.
When You Need Primer for a Touch-Up Pen
Knowing when to use primer is just as important as knowing how to apply it. Here are the clear situations where primer is a must.
Deep Scratches That Reach Bare Metal
If your scratch has gone through the clear coat and the base coat down to the metal, you absolutely need primer. Exposed metal will rust quickly, especially in wet or salty conditions. A self-etching primer is the best choice here. It bites into the metal surface and creates a strong bond.
Before applying primer, clean the area with rubbing alcohol. Then lightly sand the scratched area with fine-grit sandpaper, around 600 to 800 grit. This gives the primer something to grip onto.
Chips That Show Bare Metal or Plastic
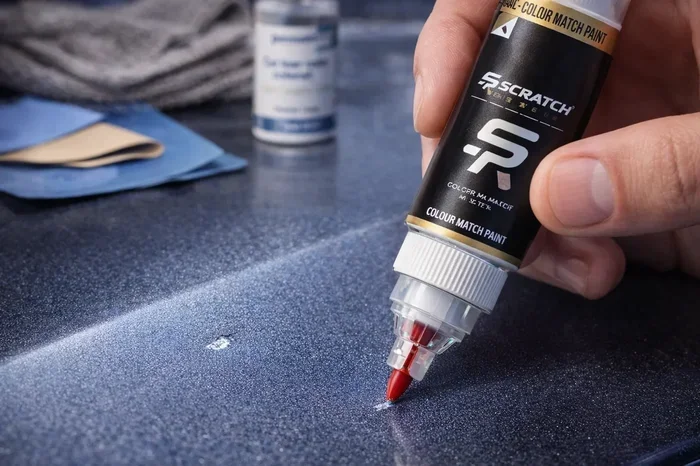
Stone chips from highway driving often expose bare metal or plastic underneath. These spots are vulnerable to corrosion. Using a touch-up kit with primer built in can save you time. Some touch-up pens come with a primer tip already included.
If your pen does not have a primer tip, apply a thin layer of separate primer first. Let it dry fully before adding the touch-up paint. Rushing this step leads to poor paint adhesion and an uneven finish.
Repainting Large Areas
When the damage covers a larger area, primer becomes even more important. A big patch of fresh paint without primer will stand out. It will look dull and uneven compared to the surrounding paint. Primer ensures the new paint blends seamlessly with the existing automotive paint.
Cars with Plastic Bumpers
Plastic bumpers need special primer designed for plastic surfaces. Regular metal primer will not bond well to plastic. Look for a plastic primer or a primer specifically labeled for bumper repair. This ensures the paint stays put and does not crack or peel.
When You Can Skip Primer for a Touch-Up Pen
Not every repair requires primer. In fact, using primer when you do not need it can sometimes cause more harm than good. Here are the situations where you can safely skip it.
Surface-Level Scratches Only
If the scratch only affects the clear coat, primer is not needed. These are the shallow marks you can feel with your fingernail but do not see down to the base color. A simple touch-up with the pen alone will restore the look.
Clean the area, apply the touch-up paint, and let it cure. No sanding, no primer, no fuss. This is the easiest type of repair and takes just minutes.
Very Small Chips
Tiny chips, like those from a pebble hit, often do not need primer either. If the damage is smaller than a pencil eraser and does not show bare metal, the touch-up pen alone works fine. Apply a small dot of paint, let it dry, and you are done.
Keep in mind that even small chips on a color match area should be treated quickly. The longer they sit exposed, the higher the risk of rust forming underneath.
Cars with Good Existing Paint Condition
If your car paint is in great shape and the damage is minor, skipping primer is perfectly fine. The surrounding paint already has a solid foundation. The touch-up pen will blend well without needing an extra bonding layer.
Step-by-Step: How to Apply Primer with a Touch-Up Pen
Now that you know when primer is needed, let us walk through the process. Following these steps will give you the best possible result.
Step 1: Clean the Damaged Area
Start by washing the area around the scratch or chip. Use soap and water to remove dirt and grease. Then wipe it down with rubbing alcohol or a dedicated surface preparation cleaner. This removes any remaining oils or contaminants that could interfere with bonding.
Step 2: Sand Lightly
Use 600 to 800 grit sandpaper to gently scuff the damaged area. You are not trying to remove paint. You just want to create a rough surface for the primer to grip. Wipe away any dust with a clean cloth.
Step 3: Apply the Primer
Shake your primer bottle well. Apply a thin, even coat over the damaged area. Do not glob it on. A thin layer dries faster and smoother. Let it dry for the time recommended on the product label, usually 15 to 30 minutes.
Step 4: Apply the Touch-Up Paint
Once the primer is dry, apply the touch-up paint from your pen. Use steady, light strokes. Fill the scratch or chip completely. Do not overapply. Multiple thin layers are better than one thick one.
Step 5: Apply Clear Coat
After the paint has dried, apply a clear coat for protection. This restores the glossy finish and shields the repair from UV rays and weather damage. Let everything cure for at least 24 hours before washing your car.
Common Mistakes People Make with Touch-Up Pens
Even with the best intentions, mistakes happen. Here are the most common errors and how to avoid them.
- Skipping surface prep: This is the number one mistake. Dirty or greasy surfaces lead to poor adhesion and early peeling.
- Using the wrong primer type: Metal primer on plastic or vice versa will not bond properly. Always match your primer to the surface material.
- Applying too much primer: Thick primer coats crack and peel. Thin, even layers work best.
- Not letting primer dry fully: Applying paint on top of wet primer causes bubbling and poor finish quality.
- Ignoring rust spots: If you see any rust forming, treat it before applying primer and paint. Use a rust converter or sand it away first.
- Choosing the wrong color: Always double-check your car paint code before buying a touch-up pen. A poor color match will be obvious and frustrating.
Expert Insights on Touch-Up Pen Primers
Professional auto detailers and paint specialists agree on a few key points when it comes to primer for a touch-up pen. Let us share some of their best advice.
Less is more. Experts recommend using the least amount of product needed. Thick layers take longer to dry, look bulky, and are more likely to peel. A thin, even coat always wins.
Patience pays off. Rushing the drying process is the fastest way to ruin a touch-up job. Give each layer enough time to cure fully before moving to the next step. This applies to primer, paint, and clear coat alike.
Invest in quality products. Cheap touch-up pens often have poor paint durability and inconsistent color. Spending a little more on a reputable brand saves you from redoing the job in a few months.
Also, keep in mind that proper car scratch repair techniques go a long way. Even the best primer and paint will not hide a poorly prepared surface. Take your time, follow each step, and the results will speak for themselves.
Comparing Primer vs. No Primer for Touch-Up Repairs
To help you decide, here is a quick comparison of using primer versus skipping it for touch-up repairs.
| Factor | With Primer | Without Primer |
|---|---|---|
| Paint Adhesion | Strong and long-lasting | Good for small, shallow repairs |
| Rust Protection | Excellent for exposed metal | No protection for bare metal |
| Finish Smoothness | Smooth and even | May show slight texture |
| Application Time | Longer due to drying steps | Quick and simple |
| Best For | Deep scratches, chips, bare metal | Surface scratches, tiny chips |
| Durability | High, lasts years with proper care | Moderate, may need touch-up sooner |
As you can see, both approaches have their place. The key is matching the method to the type of damage you are dealing with.
How to Choose the Right Primer for Your Touch-Up Pen
Not all primers are created equal. Here is what to look for when picking one for your car paint touch-up needs.
- Self-etching primer: Best for bare metal surfaces. It creates a chemical bond with the metal for maximum grip.
- Standard automotive primer: Works well for light damage where the clear coat is damaged but the base layer is intact.
- Plastic primer: Specifically formulated for plastic bumpers and trim pieces. It prevents cracking and peeling on flexible surfaces.
- Primer with built-in color: Some primers include a base color that helps with color match accuracy. These are great for visible areas like the hood or doors.
Always check the product label to make sure it is compatible with your car paint type. Most modern cars use clear coat over base coat systems. These work well with standard automotive primers.
Quick Tips for the Best Touch-Up Results
Here are some fast tips to get the most out of your touch-up pen and primer combo.
- Work in a shaded area. Direct sunlight causes primer and paint to dry too fast, leading to uneven results.
- Keep a microfiber cloth and rubbing alcohol on hand for quick cleaning between steps.
- Use a toothpick or fine brush for precise application on small chips.
- Apply multiple thin coats instead of one thick coat for both primer and paint.
- Let everything cure for at least 24 hours before exposing the repair to water or dirt.
- Store your touch-up pen in a cool, dry place to keep the paint fresh.
- If you are unsure about the color match, test the pen on a hidden area first.
These simple habits make a huge difference in how your repair looks and how long it lasts. A little extra care during the process saves you from doing it all over again.
Final Thoughts on Primer for Touch-Up Pens
So, do you need primer for a touch-up pen? The answer depends on the damage. For deep scratches, chips that show bare metal, and larger repair areas, primer is essential. It provides adhesion, prevents rust, and delivers a smooth, professional finish.
For surface-level scratches and tiny chips, you can skip primer and get great results with the touch-up pen alone. The key is understanding the depth of the damage and choosing the right approach.
Remember that surface preparation is just as important as the primer itself. Clean the area properly, sand lightly, and apply thin, even coats. Follow these steps and your car will look as good as new.
Taking care of small damage quickly also prevents bigger problems down the road. A few minutes of repair work today can save you from costly paint jobs or rust treatment in the future. Keep a quality touch-up pen and primer in your garage, and you will be ready for whatever your car faces on the road.
Whether you are maintaining a daily driver or keeping a classic looking sharp, knowing when and how to use primer gives you the confidence to handle repairs on your own. It is a simple skill that pays off for years to come. Your car deserves the best care, and now you have the knowledge to deliver it.
Frequently Asked Questions
Can I use a touch-up pen without primer on a deep scratch?
It is not recommended. Deep scratches that reach bare metal need primer to prevent rust and ensure the paint sticks properly. Skipping primer on deep damage can lead to peeling and corrosion over time.
How long should I wait between primer and touch-up paint?
Wait at least 15 to 30 minutes for the primer to dry completely. Check the product label for the exact drying time. Applying paint on wet primer causes bubbling and poor adhesion.
What kind of primer works best for car touch-ups?
Self-etching primer is best for bare metal, while standard automotive primer works well for light damage. For plastic bumpers, use a primer specifically designed for plastic surfaces to ensure proper bonding.
Will primer change the color of my touch-up paint?
No, primer is usually white or gray and does not affect the final paint color. However, using a primer with a built-in base color can help improve your color match accuracy on visible repair areas.
Can I apply clear coat over primer without touch-up paint?
It is best to apply touch-up paint between the primer and clear coat. The paint provides the color, while the primer and clear coat protect and seal the repair. Skipping the paint will leave a dull, unfinished spot.
Is it okay to use touch-up pen primer on a rusted area?
Yes, but you must treat the rust first. Use a rust converter or sand away the rust before applying primer. Applying primer over active rust will not stop the corrosion from spreading underneath the paint.
=== CONCLUSION ===
Knowing whether you need primer for a touch-up pen comes down to understanding the damage and your car paint type. Small surface scratches need no primer, while deep scratches and exposed metal absolutely do. The right approach saves time, money, and keeps your car looking great.
Follow the steps outlined in this guide, avoid common mistakes, and take your time with each repair. A little patience and the right products go a long way in protecting your car and maintaining its appearance. Keep this guide handy for your next touch-up project and enjoy the confidence of a job well done.