Your Complete Guide to DIY Window Tint Kits and Tools
This complete guide covers everything you need to know about DIY window tint kits and tools. You will learn which tools matter, how to pick the right film, and how to apply tint like a pro. Save money, boost privacy, and protect your car with our easy-to-follow steps and expert tips.
Have you ever looked at your car’s windows and thought they could use a makeover? Maybe the sun beats down on your dashboard every summer, or you crave more privacy while driving. Whatever your reason, DIY window tint can transform your vehicle in just one weekend.
Tinting your windows yourself might sound intimidating at first. But with the right DIY window tint kits and tools, it becomes a straightforward project anyone can handle. This guide walks you through every step, from choosing the best film to avoiding common mistakes that ruin installations.
We have helped thousands of car owners learn how to tint windows at home. The process is cheaper, more satisfying, and surprisingly simple once you understand the basics. Let us dive into everything you need to know about DIY window tint projects.
Key Takeaways
- Right tools make all the difference: A quality squeegee, heat gun, and spray bottle are essential for a smooth DIY window tint job.
- Film choice matters: Dyed, metallized, ceramic, and carbon films each offer different levels of heat rejection and clarity.
- Preparation is key: Cleaning your windows thoroughly and cutting film accurately will prevent most common problems.
- Patience pays off: Rushing the application process leads to bubbles, wrinkles, and peeling.
- Local laws apply: Always check your state or country tint percentage regulations before buying film.
- You can save hundreds: DIY installation costs a fraction of what professional shops charge.
📑 Table of Contents
- What Are DIY Window Tint Kits and Tools?
- Benefits of Tinting Your Windows Yourself
- Essential Tools You Need for DIY Window Tinting
- How to Choose the Right Tint Film
- Step-by-Step DIY Window Tint Installation
- Common Mistakes to Avoid When DIY Window Tinting
- Quick Tips for a Bubble-Free DIY Window Tint Finish
- Expert Insights: What Professionals Want You to Know
- Conclusion
What Are DIY Window Tint Kits and Tools?
A DIY window tint kit is a package that contains everything you need to tint your car windows at home. These kits come with pre-cut or roll-form tint film, application solution, and sometimes basic tools. The quality and contents vary widely depending on the price point and brand.
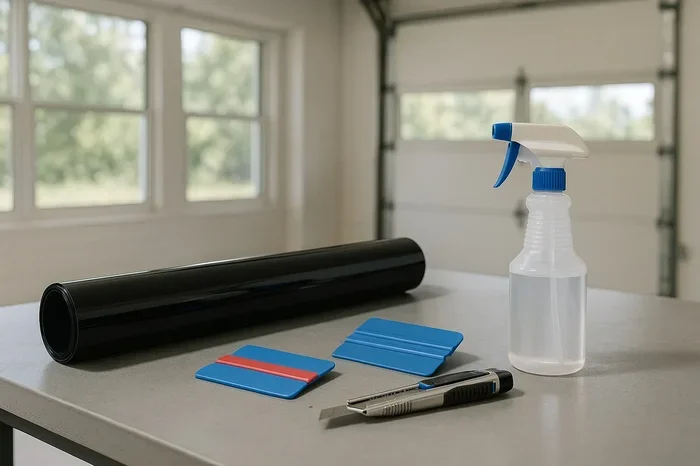
Most kits include window tint film rolls or precut pieces sized for specific vehicle models. Higher-end kits may also include a tint application tool kit with squeegees, utility knives, and spray bottles. Understanding what comes in each kit helps you choose the right one for your needs.
What Is Typically Included in a Kit
Basic DIY window tint kits and tools usually contain the following items:
- Tint film in your chosen shade and material type
- Squeegee for smoothing out film and removing water
- Application spray or soap solution for lubrication
- Utility knife or trimming tool for cutting excess film
- Heat gun or hair dryer for shaping and curing film
- Microfiber cloths for cleaning windows before application
- Razor blade or felt pad for fine trimming
Some budget kits only include the film and a small squeegee. These work for beginners but may produce less polished results. Investing in a complete tinting tools set gives you a much better chance of success.
Benefits of Tinting Your Windows Yourself
More car owners are choosing DIY window tint over professional installation. The reasons are clear and compelling. Let us explore why so many people are picking up a squeegee and doing it themselves.
Significant Cost Savings
Professional window tinting can cost anywhere from 200 to 800 dollars depending on your vehicle and film quality. A quality DIY window tint kit typically runs between 30 and 150 dollars. That means you can save 70 to 80 percent by doing it yourself.
The savings become even more dramatic if you tint multiple vehicles or want premium ceramic tint film. Professional shops charge premium rates for high-end materials, but DIY lets you buy film directly and apply it yourself at no extra labor cost.
Complete Control Over Your Results
When you do it yourself, you control every aspect of the job. You choose the exact tint percentage for each window. You decide how carefully the edges are trimmed. You work at your own pace without feeling rushed.
This level of control means you can fix mistakes immediately. You can reapply any section that does not look right. Professional shops sometimes rush jobs or use lower-quality tools to save time.
Learning a Valuable Skill
Once you learn DIY window tint installation, you can tint any vehicle. This skill becomes especially useful if you own multiple cars or help friends with their vehicles. Many people turn their DIY tinting hobby into a side business after mastering the basics.
Essential Tools You Need for DIY Window Tinting
Having the right tinting tools makes the difference between a mediocre result and a flawless finish. You do not need a lot of equipment, but each tool serves an important purpose in the application process.
The Squeegee: Your Most Important Tool
A tint squeegee is the tool you will use most during installation. It pushes water and air bubbles out from under the film. The best squeegees have a soft, flexible rubber blade that glides smoothly without scratching the film.
Look for a squeegee with an ergonomic handle and a wide blade. A dual-sided squeegee with different edge profiles gives you more versatility. You will use it on every window, so invest in a quality one.
The Heat Gun or Hair Dryer
Heat application is essential for conforming film to curved window edges. A tint heat gun provides focused, adjustable heat that shapes film precisely. A standard hair dryer works in a pinch but takes longer and produces less consistent results.
Keep the heat gun moving constantly. Holding it in one spot can damage the film or crack the window. Maintain a distance of about six inches and use medium heat for best results.
Utility Knives and Trimming Tools
You need a sharp utility knife for trimming excess film from window edges. A tint trimmer or felt pad works well for final edge cleanup. Always use a fresh blade for each window to ensure clean cuts.
Dull blades tear film and leave jagged edges. Keep several replacement blades on hand. A precision cutting tool helps with tricky areas like rearview mirror bases and rear window defroster lines.
Spray Bottles and Application Solution
Most DIY window tint kits and tools include a spray bottle filled with application solution. This soapy mixture lubricates the window surface and allows you to position the film before it sticks. You can also make your own solution with a few drops of dish soap and water.
The key is to use a light mist, not a soaking. Too much solution makes it hard to squeegee out water. A fine-mist spray bottle gives you better control over the amount you apply.
How to Choose the Right Tint Film
Not all window tint film is created equal. The type you choose affects heat rejection, clarity, durability, and legality. Understanding your options helps you pick the best film for your DIY window tint project.
Dyed Window Tint
Dyed tint film is the most affordable option available. It uses multiple layers of dye to absorb heat and reduce glare. Dyed film provides good privacy and a dark, sleek appearance.
The downside is that dyed film fades over time. It may develop a purple or bluish hue after a few years of sun exposure. It also offers the lowest level of heat rejection among all film types.
Metallized Window Tint
Metallized film contains tiny metallic particles that reflect heat away from your vehicle. These films offer excellent heat rejection and are more durable than dyed options. The metallic layer also strengthens the window slightly.
However, metallized film can interfere with electronic signals. If you use GPS, Bluetooth, or keyless entry systems, the metal particles may cause interference. The film also has a shiny, reflective appearance that some people find unattractive.
Carbon Window Tint
Carbon tint film has become very popular among DIY tinting enthusiasts. It contains carbon particles that block heat effectively without metallic interference. Carbon film has a matte, non-reflective finish that looks elegant on any vehicle.
These films do not fade over time like dyed options. They maintain their color and performance for many years. Carbon window tint film offers an excellent balance of performance, appearance, and durability.
Ceramic Window Tint
Ceramic tint film represents the premium end of the market. It uses nano-ceramic particles to block heat without any metal or dye. Ceramic films offer the highest level of heat rejection while maintaining excellent clarity and signal transparency.
The downside is cost. Ceramic film is significantly more expensive than other options. However, for a DIY window tint project where you want the best results, ceramic film is worth the investment. It blocks up to 99 percent of harmful UV rays.
Understanding Tint Percentage Laws
Every state and country has laws governing how dark your window tint percentage can be. The front side windows usually must allow more light transmission than rear windows. Some regions restrict tint darkness on the windshield as well.
Before purchasing DIY window tint kits and tools, check your local regulations. Choosing a legal tint percentage saves you from fines and the hassle of having to remove and replace film. Most states allow 35 to 50 percent tint on front side windows.
Step-by-Step DIY Window Tint Installation
Now comes the fun part. Applying DIY window tint is easier than most people expect. Follow these steps carefully, and you will achieve a professional-looking result on your first attempt.
Step One: Clean Your Windows Thoroughly
Start by cleaning every window with a glass cleaner and microfiber cloth. Remove all dirt, dust, and grease from both the inside and outside surfaces. Any particles left on the glass will show under the film as bumps or specks.
Use a razor blade carefully to scrape off any stubborn residue. Wipe down the windows again with a lint-free cloth. The surface should feel perfectly smooth and clean before you begin applying film.
Step Two: Measure and Cut the Film
Measure each window carefully and cut the window tint film about one inch larger than the glass on all sides. This extra margin gives you room to adjust the film during application.
For precut kits, the pieces should already be sized correctly. If you are using roll-form film, take your time with measurements. Accurate cutting prevents the need for reapplication and reduces waste.
Step Three: Apply the Application Solution
Spray a generous layer of tint application solution onto the window. Then carefully lay the film onto the wet glass with the adhesive side facing the window. The solution allows you to slide and reposition the film before it sets.
Start from one edge and work your way across. Make sure the film is centered and aligned properly. You only get one chance to position it correctly before the adhesive begins to bond.
Step Four: Squeegee Out Water and Air
Using your tint squeegee, start from the center and push water toward the edges. Work in firm, overlapping strokes. Apply even pressure to remove all water bubbles and air pockets.
Repeat this process from multiple angles until the window looks clear and smooth. Pay special attention to corners and edges where water tends to pool. The more water you remove now, the faster the film will cure.
Step Five: Trim Excess Film
Once the window is mostly dry, use a utility knife to trim the excess film from the edges. Run the blade along the window channel gently. A felt trimming pad gives you a cleaner finish for the final edge.
Be careful not to scratch the glass or cut too deep into the film. Trim small amounts at a time rather than large chunks. Precision here determines how clean your finished edges look.
Step Six: Cure and Dry the Film
Use a tint heat gun to gently warm the edges and corners of each window. This helps the film conform to the glass and speeds up the curing process. Hold the gun at a consistent distance and avoid lingering in one spot.
Let the film cure for at least 24 to 48 hours before rolling down the windows. During this time, avoid rain and direct sunlight on the tinted windows. The adhesive needs time to bond fully with the glass surface.
Common Mistakes to Avoid When DIY Window Tinting
Even with the best DIY window tint kits and tools, mistakes can happen. Learning from common errors saves you time, money, and frustration. Here are the pitfalls every beginner should know about.
Skipping Window Cleaning
The most common mistake is not cleaning windows thoroughly enough. Even invisible dust particles create bumps under the film. Take extra time with this step, and your results will look dramatically better.
Using Too Much Water
While application solution is necessary, too much of it makes the process messy and difficult to control. Excess water pushes film around and makes it hard to squeegee out completely. Use a light, even mist instead of soaking the glass.
Rushing the Curing Process
Rolling down windows too early can peel or shift the film. Give your DIY window tint at least two full days to cure before any contact. Be patient, and your investment will last for years.
Choosing the Wrong Tint Shade
Some people pick a tint that is too dark for their needs or local laws. Always check regulations first. Consider how much visibility you need for safe driving. A medium shade often provides the best balance of privacy, heat rejection, and visibility.
Ignoring Temperature and Weather
Do not apply window tint film in direct sunlight or extreme heat. The film can cure too quickly and become impossible to reposition. Work in a shaded, temperature-controlled garage or workspace for the best results.
Quick Tips for a Bubble-Free DIY Window Tint Finish
Achieving a flawless, bubble-free tint comes down to technique and patience. Here are some quick tips that make a huge difference in your final results.
- Work in a dust-free environment: Close windows and doors, and turn off any fans that blow dust around your workspace.
- Use a second squeegee: Having a backup squeegee means you always have a clean, dry one ready when the first gets wet.
- Heat curved edges gently: Windows with curves need extra heat to conform properly. Apply heat slowly and evenly.
- Check for dust under the film: If you spot a particle, lift the film carefully and remove it with a piece of tape.
- Keep a spray bottle handy: You may need to add more solution if the film starts to stick before you have finished positioning it.
- Practice on a spare piece first: If you are new to DIY window tint, practice on a piece of glass before tackling your car windows.
Expert Insights: What Professionals Want You to Know
We spoke with several professional window tint installers about the most common issues they see with DIY applications. Their advice is simple but powerful.
Preparation is everything. The installers emphasized that 80 percent of a successful tint job happens before the film touches the glass. Clean windows, accurate measurements, and organized tools set you up for success.
Invest in good film. Professionals recommend avoiding the cheapest tint film options. Lower-quality films bubble, peel, and fade much faster. A mid-range carbon or ceramic film gives you the best long-term value.
Take your time with edges. The edges are where most DIY jobs fall apart. Spending extra time on precise trimming and heat application creates a finish that looks professionally installed.
Conclusion
DIY window tint is one of the most rewarding car care projects you can tackle at home. With the right DIY window tint kits and tools, a little patience, and the guidance in this article, you can achieve results that rival professional installations.
You now know how to choose the right film, what tools you need, and exactly how to apply tint step by step. The savings alone make it worthwhile, but the satisfaction of a job well done is the real reward.
Start with a single window if you feel nervous. Once you see how clean and professional your first result looks, you will want to tint every window in your vehicle. DIY window tint opens up a world of comfort, privacy, and protection for your car and your driving experience.
Gather your tinting tools, pick out your favorite window tint film, and give it a try this weekend. You will be glad you did.
Frequently Asked Questions
How long does it take to DIY tint all car windows?
Most people complete a full DIY window tint job in four to six hours. Your first attempt may take longer as you learn the process. With practice, you can tint all windows in under three hours.
Can I reuse window tint film if I make a mistake?
No, window tint film is designed for single application. Once the adhesive has bonded with the glass, the film cannot be reused. This is why careful preparation and positioning are so important before the film makes contact with the window.
How long does DIY window tint last before it needs replacement?
A quality DIY window tint installation lasts five to ten years depending on the film type and how well you care for it. Ceramic and carbon films tend to last longer than dyed options. Proper curing and avoiding harsh cleaning products help extend the lifespan significantly.
Is DIY window tinting legal everywhere?
DIY window tint is legal in most places, but tint darkness regulations vary by location. Always check your local laws regarding window tint percentage limits before purchasing film. Some regions have specific rules about which windows can be tinted and how dark the film can be.
What is the easiest window to start with for beginners?
The side windows are the best place to start for beginners. They are flat, easy to access, and simpler to apply film than curved rear windows. Once you gain confidence on the side windows, you can move on to the more challenging rear and windshield areas.
Do I need special skills to apply DIY window tint?
No special skills are required for DIY window tint installation. The process relies more on patience and careful technique than on artistic ability. As long as you follow the steps, clean your windows properly, and take your time, you can achieve excellent results on your very first try.