Does Your Car Need to Be Running to Program HomeLink
You do not need to start your car engine to program HomeLink, but you must turn the ignition to the “On” or “Accessory” position to power the vehicle’s electrical system. This simple step activates the HomeLink buttons without draining your battery or causing any issues. Whether you are programming a new garage door opener or resetting existing HomeLink buttons, keeping the car in the right mode is all you need.
Have you ever stood in your driveway, ready to head out, and realized you could not remember how to program your HomeLink system? You are not alone. Thousands of car owners face this same confusion every year. The biggest question that keeps coming up is whether the car needs to be running to program HomeLink. The short answer is no, but there is more to it than that.
HomeLink is one of the most convenient features modern vehicles offer. It replaces the need for a separate garage door remote and lets you control your garage door right from the inside of your car. But setting it up can feel confusing if you do not know the right steps. This guide walks you through everything you need to know about programming HomeLink, including whether your engine needs to be on, what power mode works best, and how to avoid common mistakes.
Whether you are dealing with a new vehicle or have been putting off programming your HomeLink for months, this article has you covered. We will break down each step in simple language so you can get it done quickly and confidently. Let us dive in.
Key Takeaways
- No engine required: Your car does not need to be running. Only the ignition needs to be in the “On” or “Accessory” position.
- Quick process: Programming HomeLink typically takes 10 to 30 minutes depending on your vehicle model.
- Three methods available: You can use the rolling code, fixed code, or smart button method to pair your garage door opener.
- Common mistakes matter: Starting the engine or turning the key too far can interfere with programming.
- Safety first: Always park in a safe, flat location and keep the parking brake engaged during programming.
- Battery health is key: A weak car battery can cause HomeLink programming failures, so check your battery first.
- Universal compatibility: HomeLink works with most garage door openers manufactured after 1993.
📑 Table of Contents
- What Is HomeLink and Why Does It Matter?
- Does Your Car Need to Be Running to Program HomeLink?
- Step-by-Step Guide to Programming HomeLink
- Common Problems When Programming HomeLink
- Tips for a Smooth HomeLink Setup
- HomeLink Safety Features You Should Know
- Expert Insights on HomeLink Programming
- Key Takeaways
What Is HomeLink and Why Does It Matter?
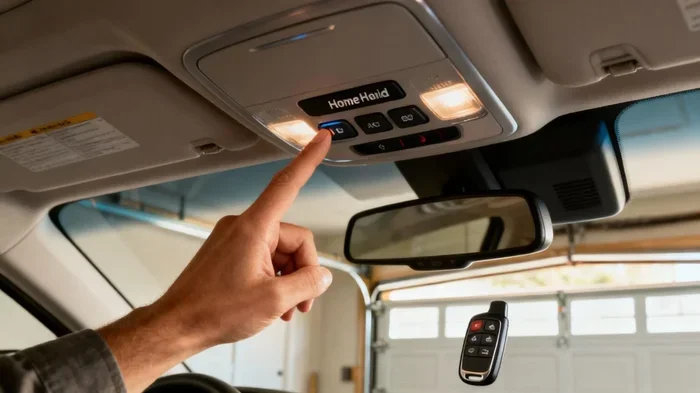
HomeLink is a built-in wireless control system found in many cars, trucks, and SUVs. It allows you to open and close your garage door, gate, or even some lighting systems directly from your vehicle. Instead of fumbling for a separate remote control, you simply press a button mounted on your sun visor or overhead console.
The system was first introduced in the late 1990s and has become a standard feature in many vehicles today. It uses radio frequency signals to communicate with your garage door opener. Most garage door manufacturers now support HomeLink compatibility, making it a universal solution for homeowners.
What makes HomeLink especially valuable is its convenience. Imagine pulling into your driveway on a rainy day. Instead of stepping out, hunting for your remote, and pressing the button, you simply press a button inside your car. The door opens smoothly, and you drive right in. It is a small feature that saves time and adds real value to your daily routine.
Another advantage of HomeLink is that it eliminates the need for multiple remotes. If you have family members who also use the same garage door, they do not need their own separate remote. The HomeLink system in your car handles it all. And if you ever sell the car, you can easily erase the programmed settings and start fresh for the next owner.
Does Your Car Need to Be Running to Program HomeLink?
This is the question that brings most people here, and the answer might surprise you. No, your car does not need to be running to program HomeLink. In fact, starting the engine is not required at all. What you do need is for the vehicle’s electrical system to be powered on. This means the ignition should be in the “On” or “Accessory” position.
Let us clarify the difference between these two things. When your car is “running,” the engine is on and the vehicle is in drive or neutral. When you program HomeLink, you do not want the engine running. You only want the electrical systems of the car to be active. This includes the dashboard lights, the infotainment system, and most importantly, the HomeLink module.
Here is why this matters. The HomeLink system draws power from the vehicle’s electrical circuit, not from the engine. When you turn the key to the “On” position or press the start button without pressing the brake (in push-button start vehicles), the car enters what is often called “accessory mode” or “ignition on” mode. In this state, all the electronics are powered, but the engine remains off. This is the perfect condition for programming HomeLink.
Understanding Your Vehicle’s Power Modes
Different vehicles have different ignition modes, and understanding them is essential for successful HomeLink programming. Here is a quick breakdown of the most common power modes you will encounter:
- Off Mode: The engine and all electrical systems are completely powered down. The dashboard is dark. HomeLink will not work in this mode.
- Accessory Mode (ACC): The electrical systems are on, but the engine is off. The radio, lights, and power outlets work. This is often sufficient for HomeLink programming.
- On Mode (IGN): All electrical systems are fully powered, and the dashboard lights up. The engine is still off. This is the most commonly recommended mode for HomeLink programming.
- Run/Start Mode: The engine is running. The vehicle is fully operational. While HomeLink may work in this mode, it is not necessary and adds no benefit.
For most vehicles, you want to be in either Accessory or On mode. Check your owner’s manual to confirm the exact position for your specific model. Some vehicles have a dedicated “Accessory” setting on the key cylinder, while others require you to press the start button once without pressing the brake pedal.
The Role of the Car’s Electrical System
Your car’s electrical system is the backbone of the HomeLink programming process. The HomeLink module needs a stable power supply to send and receive the radio frequency signals required to pair with your garage door opener. If the electrical system is not powered, the HomeLink buttons will not respond, and the programming sequence cannot begin.
This is also why your car battery matters. A weak or dying battery may not provide enough power to keep the HomeLink module active during programming. If you have been struggling to program your HomeLink, it might be worth checking your battery health first. A simple test at most auto parts stores can tell you if your battery is holding a charge properly.
Similarly, some vehicles have a 12V Car Cigarette Lighter Socket that powers accessories. While HomeLink does not use this socket directly, the overall health of your car’s 12V electrical system affects all electronic features, including HomeLink. Keeping your electrical system in good shape ensures smooth programming and reliable operation.
Step-by-Step Guide to Programming HomeLink
Now that you know your car does not need to be running, let us walk through the actual programming process. Follow these steps carefully, and you should have your HomeLink set up in less than 30 minutes.
Step 1: Prepare Your Vehicle
Park your car in a safe, flat location. Engage the parking brake fully. Turn the ignition to the “On” or “Accessory” position. Make sure the engine is off. You should see the dashboard lights come on, but the engine should not start. This is your signal that you are in the correct mode.
Clear the area around your garage door. Make sure no one is standing near the door or in its path. Safety should always come first when working with any garage door system.
Step 2: Locate the HomeLink Buttons
HomeLink buttons are typically located on the sun visor, the overhead console, or the rearview mirror mount. In some vehicles, you may need to remove a small cover to reveal the buttons. Look for three buttons arranged in a row, often labeled with numbers or left blank.
If you cannot find your HomeLink buttons, consult your vehicle’s owner manual. The exact location varies by make and model, but they are almost always in the cabin area near the roofline.
Step 3: Clear Existing Programming (If Needed)
If the HomeLink buttons have been previously programmed, you may need to clear them first. To do this, press and hold the two outer HomeLink buttons simultaneously for about 10 to 15 seconds. The indicator light will flash, and the system will reset. Release the buttons once the light starts flashing rapidly.
This step is important because old programming can interfere with new setups. Clearing the system ensures a clean slate for your new garage door opener.
Step 4: Put Your Garage Door Opener in Programming Mode
Every garage door opener manufacturer has a slightly different process for putting the remote into programming mode. Here are the general steps for the most common brands:
- Chamberlain/LiftMaster: Press and release the “Learn” button on the back of the motor unit. The indicator light will stay lit for about 30 seconds.
- Genie: Press and release the “Smart” button on the motor unit. The LED light will blink.
- Craftsman: Press and release the “Learn” button on the back of the motor unit. The light on the motor unit will glow for two to three minutes.
Make sure you complete this step within the time window provided by the manufacturer. If you wait too long, you will need to repeat the process.
Step 5: Train the HomeLink System
Now it is time to pair the HomeLink system with your garage door opener. Press and hold the HomeLink button you want to use. Keep holding it until the HomeLink indicator light changes from a slow blink to a fast blink. This usually takes about 20 seconds. Release the button once the light flashes rapidly.
Within 30 seconds, go back to your garage door opener motor unit and press the “Learn” or “Smart” button again. Then return to your car and press and hold the same HomeLink button again for two seconds. The HomeLink light should start blinking slowly, indicating it is receiving the signal.
Wait for the HomeLink indicator light to stay solid. This confirms a successful pairing. Test the system by pressing the HomeLink button. Your garage door should respond.
If you are working with a 12V To 230V Car Inverter or any other 12V accessory that shares the same electrical circuit, make sure those devices are not interfering with the HomeLink signal during programming.
Step 6: Test and Confirm
Always test your newly programmed HomeLink button before you drive away. Press the button and watch your garage door respond. If it opens or closes smoothly, you are all set. If nothing happens, repeat the programming steps and make sure your garage door opener is within range of the HomeLink module.
Some vehicles allow you to program all three HomeLink buttons for different devices. For example, you could set one button for the garage door, one for the gate, and one for outdoor lights. The process is the same for each button, just repeat the steps for each one.
Common Problems When Programming HomeLink
Even when you follow the steps correctly, things can sometimes go wrong. Here are the most common issues people face and how to fix them.
HomeLink Button Does Not Respond
If pressing the HomeLink button does nothing, the most likely cause is that the ignition is not in the correct position. Make sure the vehicle is in “On” or “Accessory” mode, not in “Off” or “Run.” Also check that your car battery is fully charged. A weak battery is one of the leading causes of HomeLink failure.
Indicator Light Does Not Flash
The HomeLink indicator light should flash during the programming process. If it does not, the system may not be receiving power. Check your vehicle’s fuse box for a blown fuse related to the HomeLink or accessory circuit. A simple fuse replacement can often solve this problem.
Garage Door Does Not Respond to HomeLink
If your garage door opener does not respond after programming, try these troubleshooting steps:
- Make sure the garage door opener is in programming mode when you train the HomeLink system.
- Check the distance between your car and the garage door motor unit. You should be within 10 feet during programming.
- Replace the battery in your garage door opener remote. A weak remote battery can cause signal issues.
- Check for interference from other electronic devices. The 200 Watt LED Light For Car or other high-power accessories can sometimes interfere with radio frequency signals.
- Try reprogramming from scratch, clearing all existing settings first.
Interference From Other Signals
HomeLink operates on a specific radio frequency, and sometimes other devices can cause interference. If you live in a dense neighborhood with many garages nearby, signal overlap is possible. In most cases, simply reprogramming the system resolves the issue. If interference persists, contact your HomeLink support line for additional guidance.
Tips for a Smooth HomeLink Setup
Getting the most out of your HomeLink system is easier than you think. Here are some practical tips to ensure a smooth setup and reliable long-term performance.
Read Your Vehicle Manual
Every vehicle is slightly different, and the owner manual contains specific instructions for your model. Before you start programming, take five minutes to read the HomeLink section in your manual. It will save you time and frustration.
Use Fresh Batteries
Use fresh, high-quality batteries in both your car and your garage door opener. Old or weak batteries are a leading cause of programming failures and unreliable operation.
Keep Your Distance During Programming
During the training phase, keep your car within 10 feet of the garage door motor unit. This ensures a strong signal and a successful pairing.
Program in Daylight
It is much easier to see the indicator lights and confirm the garage door is responding when you have good visibility. Program your HomeLink during daylight hours for the best experience.
Consider Your Garage Door Opener Age
HomeLink works with most garage door openers manufactured after 1993. If your opener is older, you may need a HomeLink universal receiver or an adapter to make it compatible. These are inexpensive and widely available at auto parts stores.
Protect Your HomeLink System
Once your HomeLink is programmed, protect your investment. Keep the system clean and free of debris. If you notice any damage to the HomeLink button or wiring, have it checked by a professional. Regular maintenance keeps everything working smoothly for years.
HomeLink Safety Features You Should Know
HomeLink is designed with safety in mind, and understanding these features can help you use the system with confidence.
First, HomeLink includes a rolling code security feature. This means the code changes every time you use it, making it nearly impossible for someone to intercept and copy your signal. This is a significant security advantage over older fixed-code garage door remotes.
Second, most HomeLink systems include an indicator light that confirms successful programming. A solid light means the system is paired and ready to go. A blinking light usually indicates an error or incomplete programming.
Third, HomeLink is designed to work seamlessly with your vehicle’s safety systems. If your car is not in park or the ignition is off, the HomeLink system will not activate. This prevents accidental garage door operation while driving.
Finally, HomeLink can be erased and reprogrammed at any time. If you sell your car or want to remove access for a previous owner, a simple reset clears all stored codes. This ensures your garage door remains secure.
Expert Insights on HomeLink Programming
Automotive technicians who specialize in electrical systems often see the same mistakes repeated when it comes to HomeLink programming. The most common error is starting the engine during programming. This is unnecessary and can sometimes cause the system to lock up, requiring a full reset.
Another expert tip is to never rush the process. Each step has a specific time window, and missing it means starting over. Patience pays off when it comes to HomeLink setup. Take your time, follow the steps in order, and you will have a working system in no time.
Some professionals also recommend keeping a written record of which HomeLink button controls which device. This is especially helpful if you program multiple buttons for different garage doors or gates. A small label on the visor can save a lot of confusion later.
One more insight from the pros: if you are having persistent issues, try unplugging and replugging the HomeLink module connector (if accessible). Sometimes a simple reset of the module itself clears up stubborn problems. This is a trick that even experienced car owners do not always know about.
Key Takeaways
- No engine required: Your car does not need to be running to program HomeLink. Only the ignition needs to be in the “On” or “Accessory” position.
- Quick process: Programming HomeLink typically takes 10 to 30 minutes depending on your vehicle model.
- Three methods available: You can use the rolling code, fixed code, or smart button method to pair your garage door opener.
- Common mistakes matter: Starting the engine or turning the key too far can interfere with programming.
- Safety first: Always park in a safe, flat location and keep the parking brake engaged during programming.
- Battery health is key: A weak car battery can cause HomeLink programming failures, so check your battery first.
- Universal compatibility: HomeLink works with most garage door openers manufactured after 1993.
Frequently Asked Questions
Can I program HomeLink with the engine off?
Yes, absolutely. You do not need the engine running to program HomeLink. You only need the ignition to be in the “On” or “Accessory” position, which powers the electrical systems without starting the engine. This is the recommended and safest way to program HomeLink.
How long does it take to program HomeLink?
Most HomeLink programming sessions take between 10 and 30 minutes. The exact time depends on your vehicle model, the garage door opener brand, and how many buttons you are programming. Being patient and following each step carefully will help you avoid having to repeat the process.
What should I do if HomeLink programming fails?
If programming fails, start by checking your car battery and making sure the ignition is in the correct position. Clear any existing programming and try again. Make sure your garage door opener is in programming mode and within 10 feet of your car. Replace the remote battery if needed and eliminate potential signal interference.
Can HomeLink control devices other than garage doors?
Yes, HomeLink can control a variety of devices beyond garage doors. Many homeowners use HomeLink to operate gates, lighting systems, and even some smart home devices. Check your HomeLink user guide for a list of compatible accessories and devices you can pair with the system.
Is it safe to program HomeLink in a closed garage?
It is not recommended to program HomeLink inside a closed garage. The radio frequency signals used during programming can be blocked or weakened by closed garage doors and walls. Always program HomeLink outside or with the garage door fully open for the best signal strength and a successful pairing.
Do I need special equipment to program HomeLink?
No special equipment is needed. You only need your vehicle with the ignition in the “On” or “Accessory” position, your garage door opener remote, and access to the “Learn” or “Smart” button on your garage door motor unit. Everything else is built into your vehicle and garage door opener.
=== CONCLUSION ===
Programming your HomeLink system does not require your car to be running. All you need is the ignition in the “On” or “Accessory” position, a fully charged car battery, and a few minutes of your time. By following the steps outlined in this guide, you can set up your HomeLink quickly and enjoy the convenience of controlling your garage door right from your vehicle.
Remember to avoid the common mistakes, like starting the engine during programming or skipping the clearing step. Take your time, be patient, and do not hesitate to consult your vehicle manual if you get stuck. With a little effort, you will have a fully functioning HomeLink system that makes your daily routine smoother and more convenient.
Once your HomeLink is programmed, you will wonder how you ever managed without it. It is one of those small car features that makes a big difference in everyday life. So go ahead, give it a try, and enjoy the ease of hands-free garage door control.