How to Install Cargo Netting for Secure and Safe Hauling
Learn how to install cargo netting the right way with this complete step-by-step guide. Whether you haul gear for work or load up your truck for a weekend trip, proper cargo netting installation keeps everything secure and safe on the road. This guide walks you through every step, from choosing the right net type to testing for stability, so you can haul with confidence every time.
Hauling stuff in your truck or SUV can be a real headache if things shift around while you drive. Loose gear sliding around in the back of your vehicle is not just annoying. It is dangerous. A how to install cargo netting guide can change all of that in just a few minutes of your time.
Whether you are a contractor hauling tools to a job site or a weekend adventurer heading out with camping gear, secure cargo transport matters a lot. A good cargo net installation keeps your belongings in place and protects everyone on the road. In this guide, we walk you through everything you need to know. You will learn about different net types, the tools you need, and the exact steps to get the job done right.
The best part is that you do not need to be a mechanic or a DIY expert. With the right information and a little patience, anyone can do this. Let us dive in and get your load secured the proper way.
Key Takeaways
- Choose the right net type: Bungee, ratchet, and heavy-duty nets each serve different hauling needs.
- Gather your tools first: Having anchor points, hooks, and straps ready makes the process smooth.
- Follow the step-by-step method: Proper stretching and tensioning prevent sagging and shifting.
- Avoid common mistakes: Over-tightening, using worn nets, and skipping stability checks cause problems.
- Maintain your netting regularly: Cleaning and inspecting extends the life of your cargo net.
- Test before every trip: A quick shake test ensures your load stays put on the road.
📑 Table of Contents
Why Cargo Netting Matters for Safe Hauling
Many people underestimate the importance of load securing. They toss stuff in the truck bed and hope for the best. That approach works fine until you hit a bump, take a sharp turn, or need to brake hard. At that point, loose items can fly around and cause serious damage or even accidents.
Cargo tie-down straps and nets solve this problem by holding everything firmly in place. They act as a cargo retention system that keeps your load stable no matter what the road throws at you. Here is why cargo netting is so important:
- Safety first: A secure load prevents debris from flying off your vehicle and hitting other drivers.
- Protect your gear: Shifting cargo can get damaged during transport. Nets prevent that.
- Legal compliance: Many states require proper load securing methods for open truck beds.
- Peace of mind: Knowing your stuff is safe lets you focus on driving.
Quick Tips for Better Load Securing
Before you even think about cargo net installation, keep these quick tips in mind:
- Always distribute weight evenly across the truck bed.
- Place heavier items closer to the cab and lighter items on top.
- Never exceed your vehicle’s maximum payload capacity.
- Check your local laws about secure cargo transport requirements.
Types of Cargo Netting You Can Choose From
Not all cargo nets are the same. Different types serve different purposes, and picking the right one is the first step toward a successful cargo net installation. Let us look at the most common options available for truck bed netting and other vehicles.
Bungee Cargo Nets
Bungee cargo nets use elastic cords to stretch over your load. They are the most popular type for everyday use. You can find them at almost any auto parts store. They are easy to stretch, simple to attach, and work great for light to medium loads.
These elastic cargo nets are perfect for hauling things like lawn furniture, grocery bags, or camping gear. The downside is that bungee cords can lose their stretch over time. Sun exposure and wear can weaken them fast. Always inspect yours before every trip.
Ratchet Cargo Nets
Ratchet cargo nets use a tightening mechanism that lets you pull the net very tight. They are ideal for heavy-duty cargo net applications. If you are hauling construction materials, motorcycles, or heavy equipment, a ratchet net gives you the tension you need.
The ratchet system works like a belt. You hook it onto your anchor points, pull the handle to tighten, and lock it in place. This type of cargo strap netting provides the strongest hold. However, it takes a bit more effort to install than a bungee net.
Heavy-Duty Cargo Nets
Heavy-duty cargo nets are built for serious hauling. They use thick rope or webbing and reinforced cargo net hooks. These nets handle the toughest vehicle cargo management challenges. Construction crews, farmers, and off-road enthusiasts rely on them.
A heavy-duty cargo net can handle weights that would destroy a regular bungee net. They are also more durable and resistant to wear. The trade-off is that they are heavier and bulkier to store when not in use.
Comparison Table: Bungee vs Ratchet vs Heavy-Duty Nets
| Feature | Bungee Net | Ratchet Net | Heavy-Duty Net |
|---|---|---|---|
| Best For | Light to medium loads | Medium to heavy loads | Very heavy loads |
| Ease of Installation | Very easy | Moderate | Moderate to hard |
| Durability | Low to medium | Medium to high | Very high |
| Cost | Low | Medium | High |
| Best Use Case | Groceries, camping gear | Furniture, appliances | Construction materials, equipment |
| Weather Resistance | Fair | Good | Excellent |
Expert Insight: Picking the Right Net
Industry experts always say to match your net to the job. A bungee cargo net is fine for a day trip to the beach. But for a cross-country move with heavy furniture, you want a ratchet or heavy-duty option. Think about what you haul most often and invest in the right type. A good cargo net for trucks pays for itself by preventing damage and accidents.
Tools and Materials You Will Need
Before you start any cargo net installation, gather everything you need. Having the right tools makes the process faster and much smoother. Here is a checklist of what you will need:
- Cargo net (the right type and size for your load)
- Cargo net hooks or J-hooks
- Cargo tie-down straps for extra support
- Anchor points or stake pockets (most truck beds have these)
- A tape measure to size your net correctly
- Rubber mallet (for fitting hooks into tight spots)
- Gloves to protect your hands during installation
Some vehicles come with built-in tie-down points. If yours does not, you can buy aftermarket pickup truck accessories like bed rail clamps or roof rack mounts. These expand your options for secure cargo transport and make cargo net installation much easier.
Quick Tip: Measure Twice, Install Once
Before buying a net, measure your truck bed or cargo area. A net that is too small will not cover your load properly. A net that is too big will sag and shift. Measure the length and width of your bed, then add a few inches for overlap. This simple step saves a lot of frustration later.
Step-by-Step Guide to Install Cargo Netting
Now comes the fun part. Follow these steps carefully to get a clean, secure cargo net installation every time. Whether you are working with a bungee cargo net or a ratchet cargo net, the basic process is similar.
Step 1: Prepare Your Vehicle
Start by cleaning out your truck bed or cargo area. Remove any debris, dirt, or items you are not hauling. A clean surface helps the net grip better and prevents scratches. Make sure your anchor points are free of rust and damage. If any anchor points look worn, replace them before you start.
Next, lay your cargo net flat on the truck bed. This gives you a clear view of how everything lines up. Check that all the hooks and straps are accounted for and in good condition.
Step 2: Attach the Anchor Points
Now attach the cargo net hooks to your anchor points. Start at the corners first. Most truck beds have stake pockets along the sides. Hook the net corners into these pockets firmly.
If your vehicle does not have stake pockets, you can use tie-down straps looped around the bed rails. Some people also use roof cargo net systems for overhead hauling. Whatever method you choose, make sure each connection point is tight and secure.
Pro tip: Always attach the net on the side closest to you first. This gives you better control and keeps the net from blowing around in the wind.
Step 3: Stretch and Secure the Net
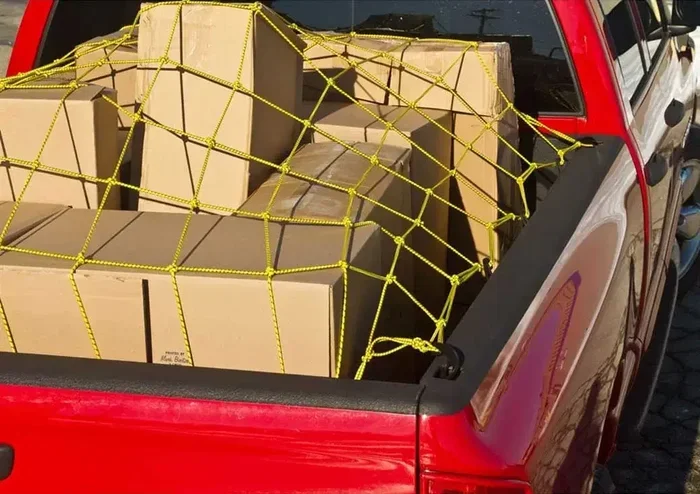
Once all the corners are attached, pull the net tight across the cargo area. You want the net to be firm but not overstretched. A good rule of thumb is that you should be able to press the net about one inch inward with moderate pressure.
If you are using a ratchet cargo net, now is the time to engage the ratchet mechanism. Pull the handle slowly and evenly. Do not yank it tight all at once. Gradual tension prevents damage to the net and your vehicle.
For bungee cargo nets, stretch the elastic cords evenly across the load. Make sure each cord is attached to a secure point. Uneven stretching causes sagging, and sagging leads to shifting cargo.
Step 4: Test for Stability
This is the step most people skip, and it is the most important. After you finish cargo net installation, give the net a firm shake. Push down on the center of the load. Walk around the vehicle and check every connection point.
If anything moves or feels loose, tighten it up before you drive. A cargo retention system only works if every part is doing its job. Take a short test drive in a safe area. Pay attention to any noise or movement from the cargo area.
Expert Insight: The Shake Test
Experienced haulers always perform the shake test before every trip. It takes only ten seconds and can save you from a costly accident. If the net moves more than a few inches when you shake it, re-tension or reattach the hooks. Better safe than sorry.
Common Mistakes to Avoid When Installing Cargo Netting
Even with the best instructions, people make mistakes during cargo net installation. Knowing what goes wrong helps you avoid those same errors. Here are the most common mistakes and how to prevent them.
Mistake 1: Using a Net That Is Too Small
A common error is grabbing a net that does not cover the full cargo area. A small cargo cover net leaves gaps where items can slide out. Always choose a net that extends past the edges of your load. Extra coverage means extra safety.
Mistake 2: Over-Tightening the Net
It might seem like tighter is better, but over-tightening can damage both the net and your vehicle. Excessive tension stretches the material beyond its limits and can tear anchor points. Keep the tension firm but not extreme. The net should be snug, not drum-tight.
Mistake 3: Ignoring Wear and Tear
Old, frayed nets are a serious safety hazard. Sun damage, moisture, and regular use weaken the material over time. A torn cargo strap netting will not hold your load. Inspect your net before every use. Replace any net that shows signs of cracking, stretching, or fraying.
Mistake 4: Skipping the Stability Check
Many people install the net and drive off without testing it. As we covered earlier, the shake test is essential. Skipping this step means you could be hauling an insecure load without even knowing it.
Mistake 5: Using the Wrong Type of Net
Not every net works for every job. Using a light bungee cargo net for heavy construction materials is a recipe for disaster. Match your net type to the weight and size of your load. When in doubt, go with a heavier-duty option.
Maintenance Tips for Long-Lasting Cargo Netting
A good cargo net can last for years with proper care. Maintenance is simple and only takes a few minutes. Follow these tips to keep your vehicle cargo management system in top shape.
Clean Your Net Regularly
Dirt, mud, and road salt can degrade the material over time. After each use, give your net a quick rinse with water. If it is really dirty, use mild soap and let it air dry completely before storing it. Never store a wet net, as this promotes mold and mildew.
Store It Properly
When not in use, keep your net in a cool, dry place. Direct sunlight breaks down elastic materials and weakens the fabric. A garage or shed is ideal. Folding the net neatly also prevents tangling and keeps the hooks from bending.
Replace Worn Parts Promptly
Hooks, straps, and bungee cords all wear out at different rates. Check each component individually. If a hook is bent or a strap is frayed, replace just that part. Most cargo net hooks and straps are sold separately and are inexpensive to replace.
Key Takeaways for Maintenance
- Rinse your net after every use to remove dirt and chemicals.
- Air dry completely before storing to prevent mold.
- Inspect hooks and straps for wear before each trip.
- Store in a cool, dry place away from direct sunlight.
- Replace damaged parts immediately rather than waiting for failure.
Expert Insight: Extending Net Life
Professional haulers know that maintenance is the secret to saving money. A heavy-duty cargo net that is well cared for can last five years or more. That is much cheaper than replacing damaged nets every season. A little effort goes a long way in protecting your investment and keeping your secure cargo transport reliable.
Conclusion
Installing cargo netting does not have to be complicated or intimidating. With the right net type, the proper tools, and a clear step-by-step process, anyone can do it. A solid how to install cargo netting approach keeps your load safe, protects other drivers on the road, and saves you money on damaged gear.
Remember to choose the right net for your needs. Bungee nets work great for light loads. Ratchet nets handle medium to heavy cargo. Heavy-duty nets are your best choice for the toughest jobs. Always test your installation before hitting the road, and maintain your net regularly for the best results.
Take a few minutes today to check your current setup. If your net is worn or your method is lacking, now is the perfect time to upgrade. Proper cargo net installation is one of the simplest things you can do to make every haul safer and more efficient. Get out there, secure your load, and drive with confidence.
Frequently Asked Questions
Can I install cargo netting on any vehicle?
Yes, you can install cargo netting on most vehicles including trucks, SUVs, vans, and even cars with roof racks. The key is finding anchor points that are strong enough to hold the net in place. If your vehicle does not have built-in tie-down points, you can use aftermarket pickup truck accessories or universal mounting kits.
How do I know which size cargo net I need?
Measure the length and width of your cargo area or truck bed. Add a few inches to each measurement for overlap and proper coverage. A net that is slightly larger than your cargo area works better than one that is too small. Proper sizing is essential for effective load securing and a successful cargo net installation.
Is cargo netting legal for road use?
In most states and regions, using cargo netting to secure loads in open truck beds is not only legal but required. Laws vary by location, so check your local regulations. Generally, you must ensure that no part of your load can fall, spill, or blow off the vehicle. Proper secure cargo transport methods like nets and straps help you stay compliant.
Can I use cargo netting for roof loads?
Absolutely. Roof cargo nets are specifically designed for overhead hauling. They work great for hauling items like kayaks, bikes, or extra luggage on a roof rack. Just make sure the net is rated for the weight of your load and that it is attached tightly to the roof rack anchor points.
How do I clean my cargo net?
Cleaning your cargo netting is simple. Rinse it with water after each use to remove dirt and debris. For deeper cleaning, use mild soap and a soft brush, then let it air dry completely. Never machine wash or put your net in a dryer, as this can damage the elastic and fabric materials.
What is the difference between bungee nets and ratchet nets?
Bungee cargo nets use elastic cords that stretch to cover your load. They are easy to install and best for light to medium loads. Ratchet cargo nets use a mechanical tightening system that provides much stronger tension. They are better suited for heavier loads and situations where maximum hold is needed. Choose based on the weight and type of cargo you typically haul.